Baked Manicotti with Kale (Merry Christmas!)
 Ok – it’s time to get into the extra-cheesy holiday recipes. Really, I just wanted to post a recipe for Vodka Sauce, but perfecting the vodka…(sauce) recipe, combined with a couple of rounds of Santa Claus, Go Straight to the Ghetto on Christmas Day, we are now well into the Harlem Holiday Spirit!
Baked Manicotti with Kale for 4
- 1/2 recipe Vodka Sauce
- 8 large leaves curly leaf kale
- 8 fresh manicotti (I used fresh, store-bought)
- 1 t. olive oil
- 1t. white balsamic vinegar
- Pinch of salt
 Prepare the Vodka Sauce.
Prepare manicotti if making from scratch (ok, I promise a recipe for this some day. In the meantime, see what your local Italian deli has available. Stuffed shells would be awesome here too).
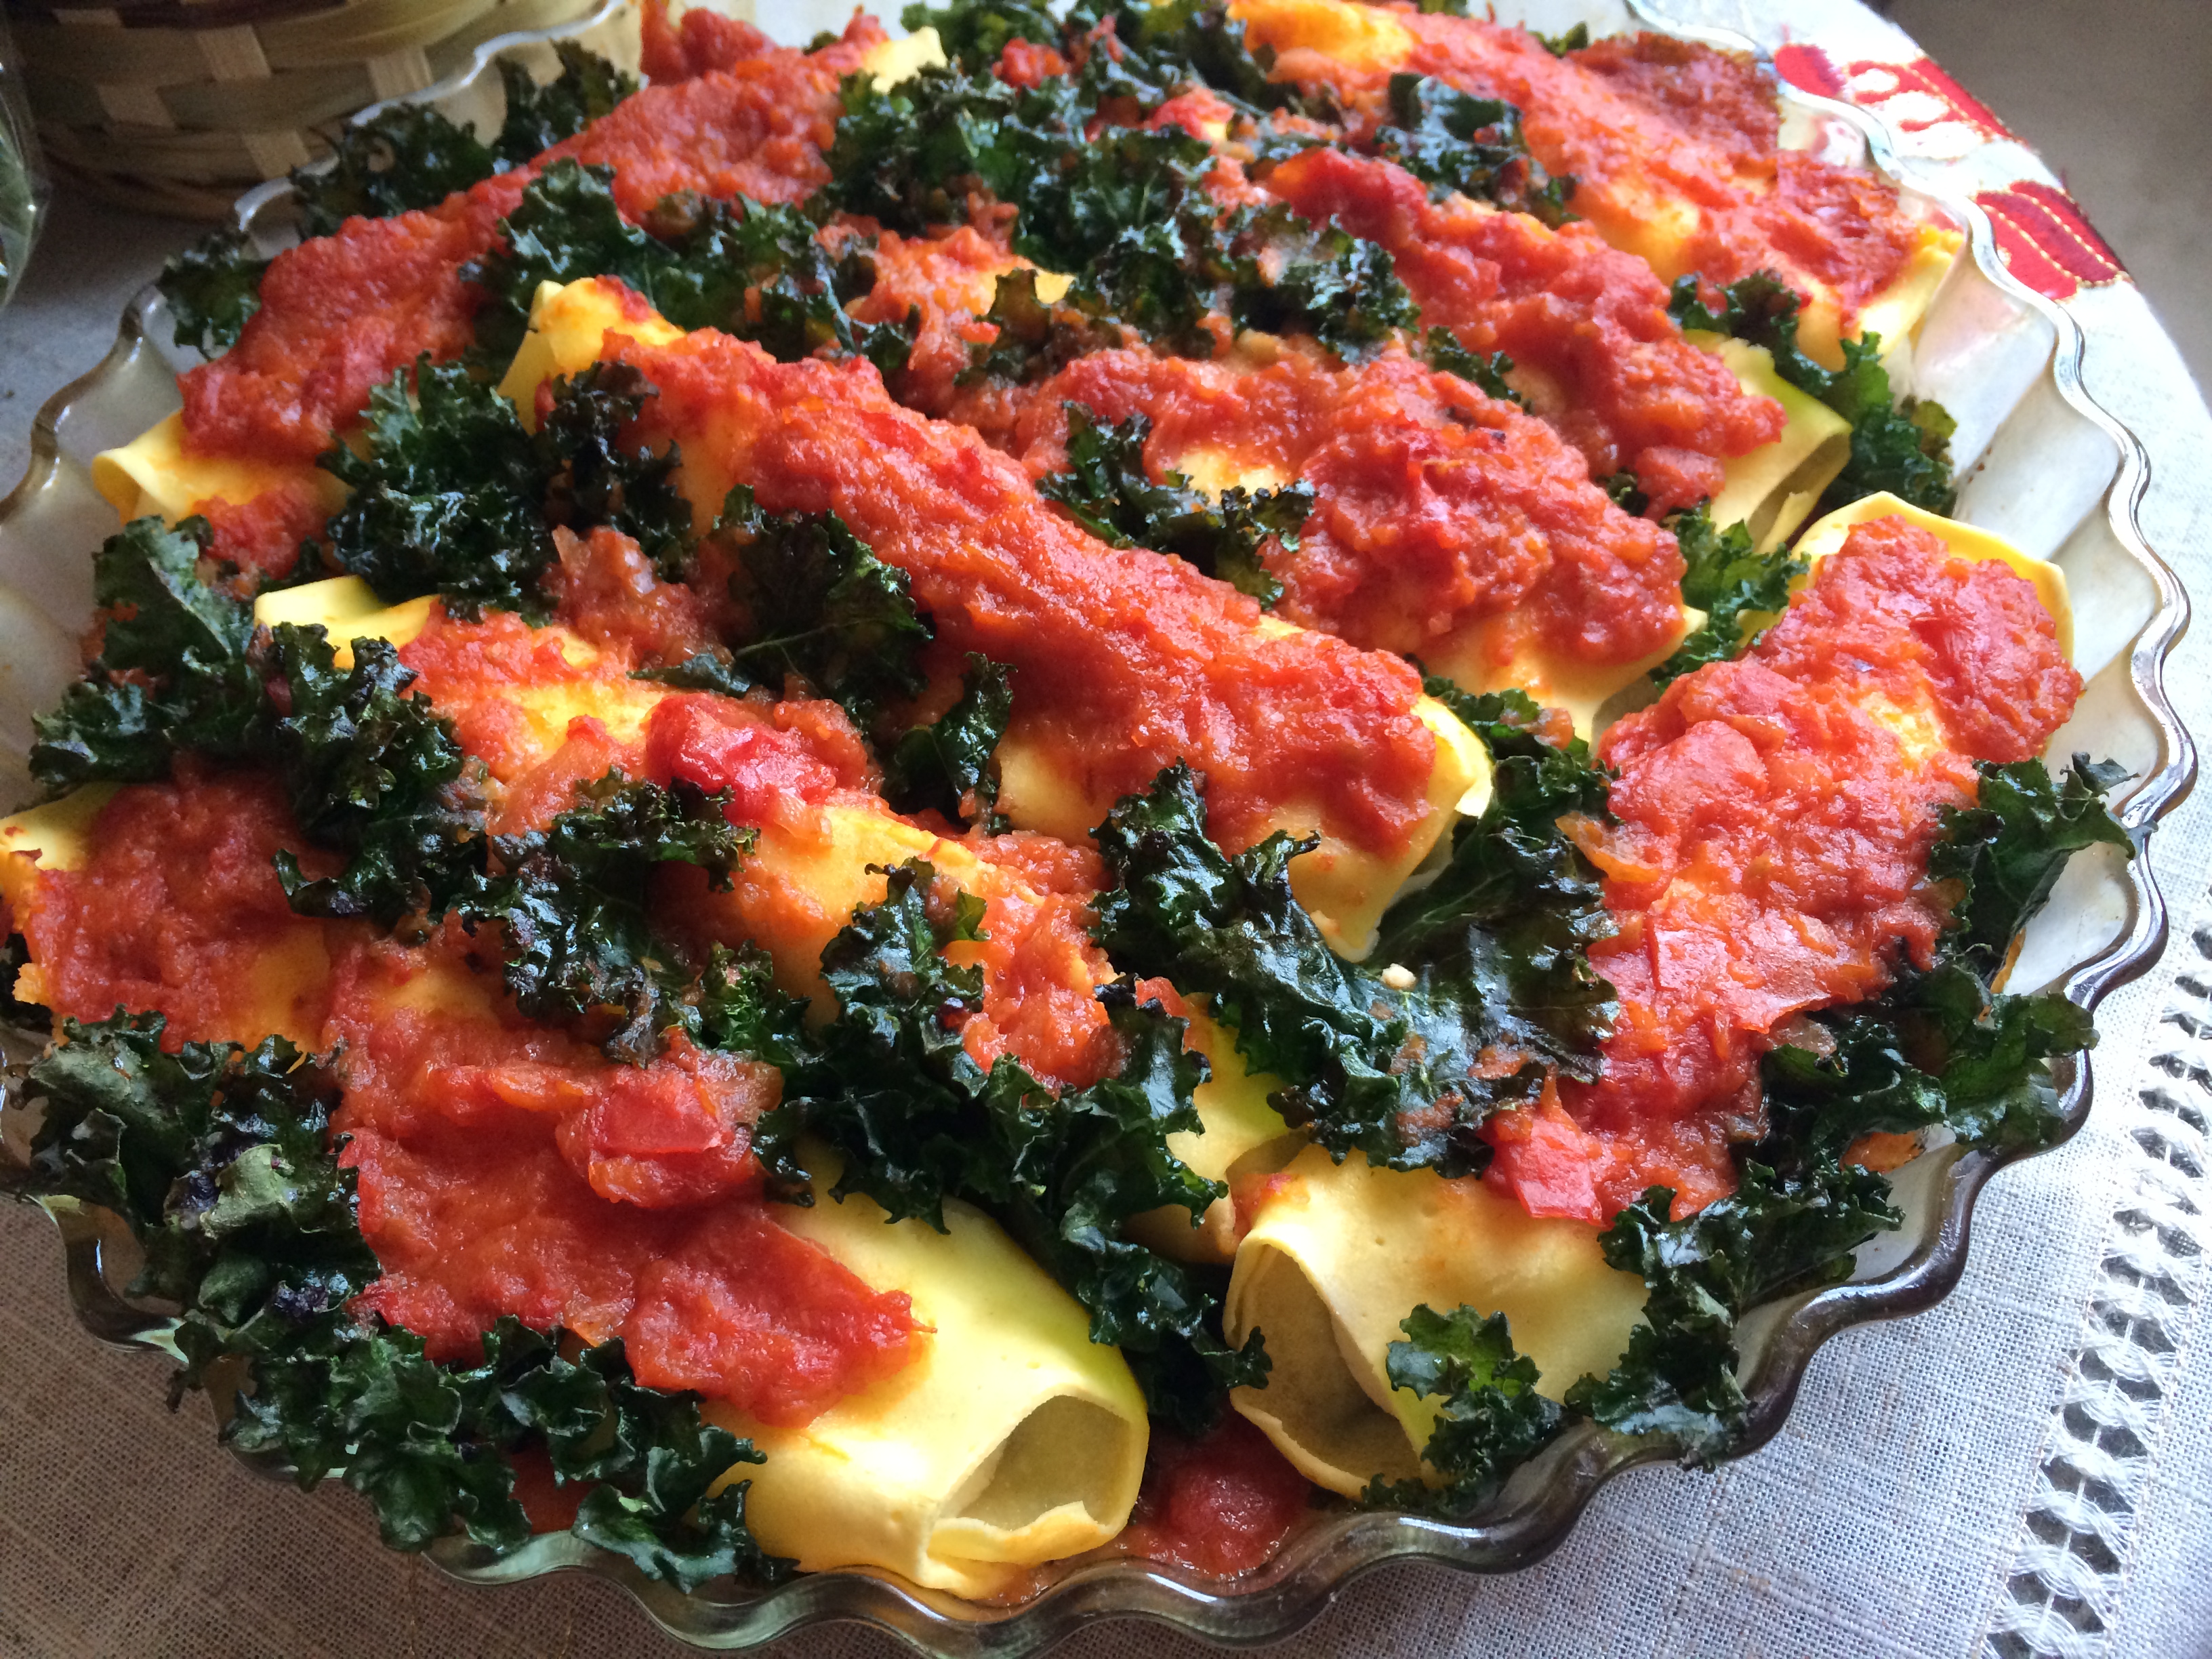
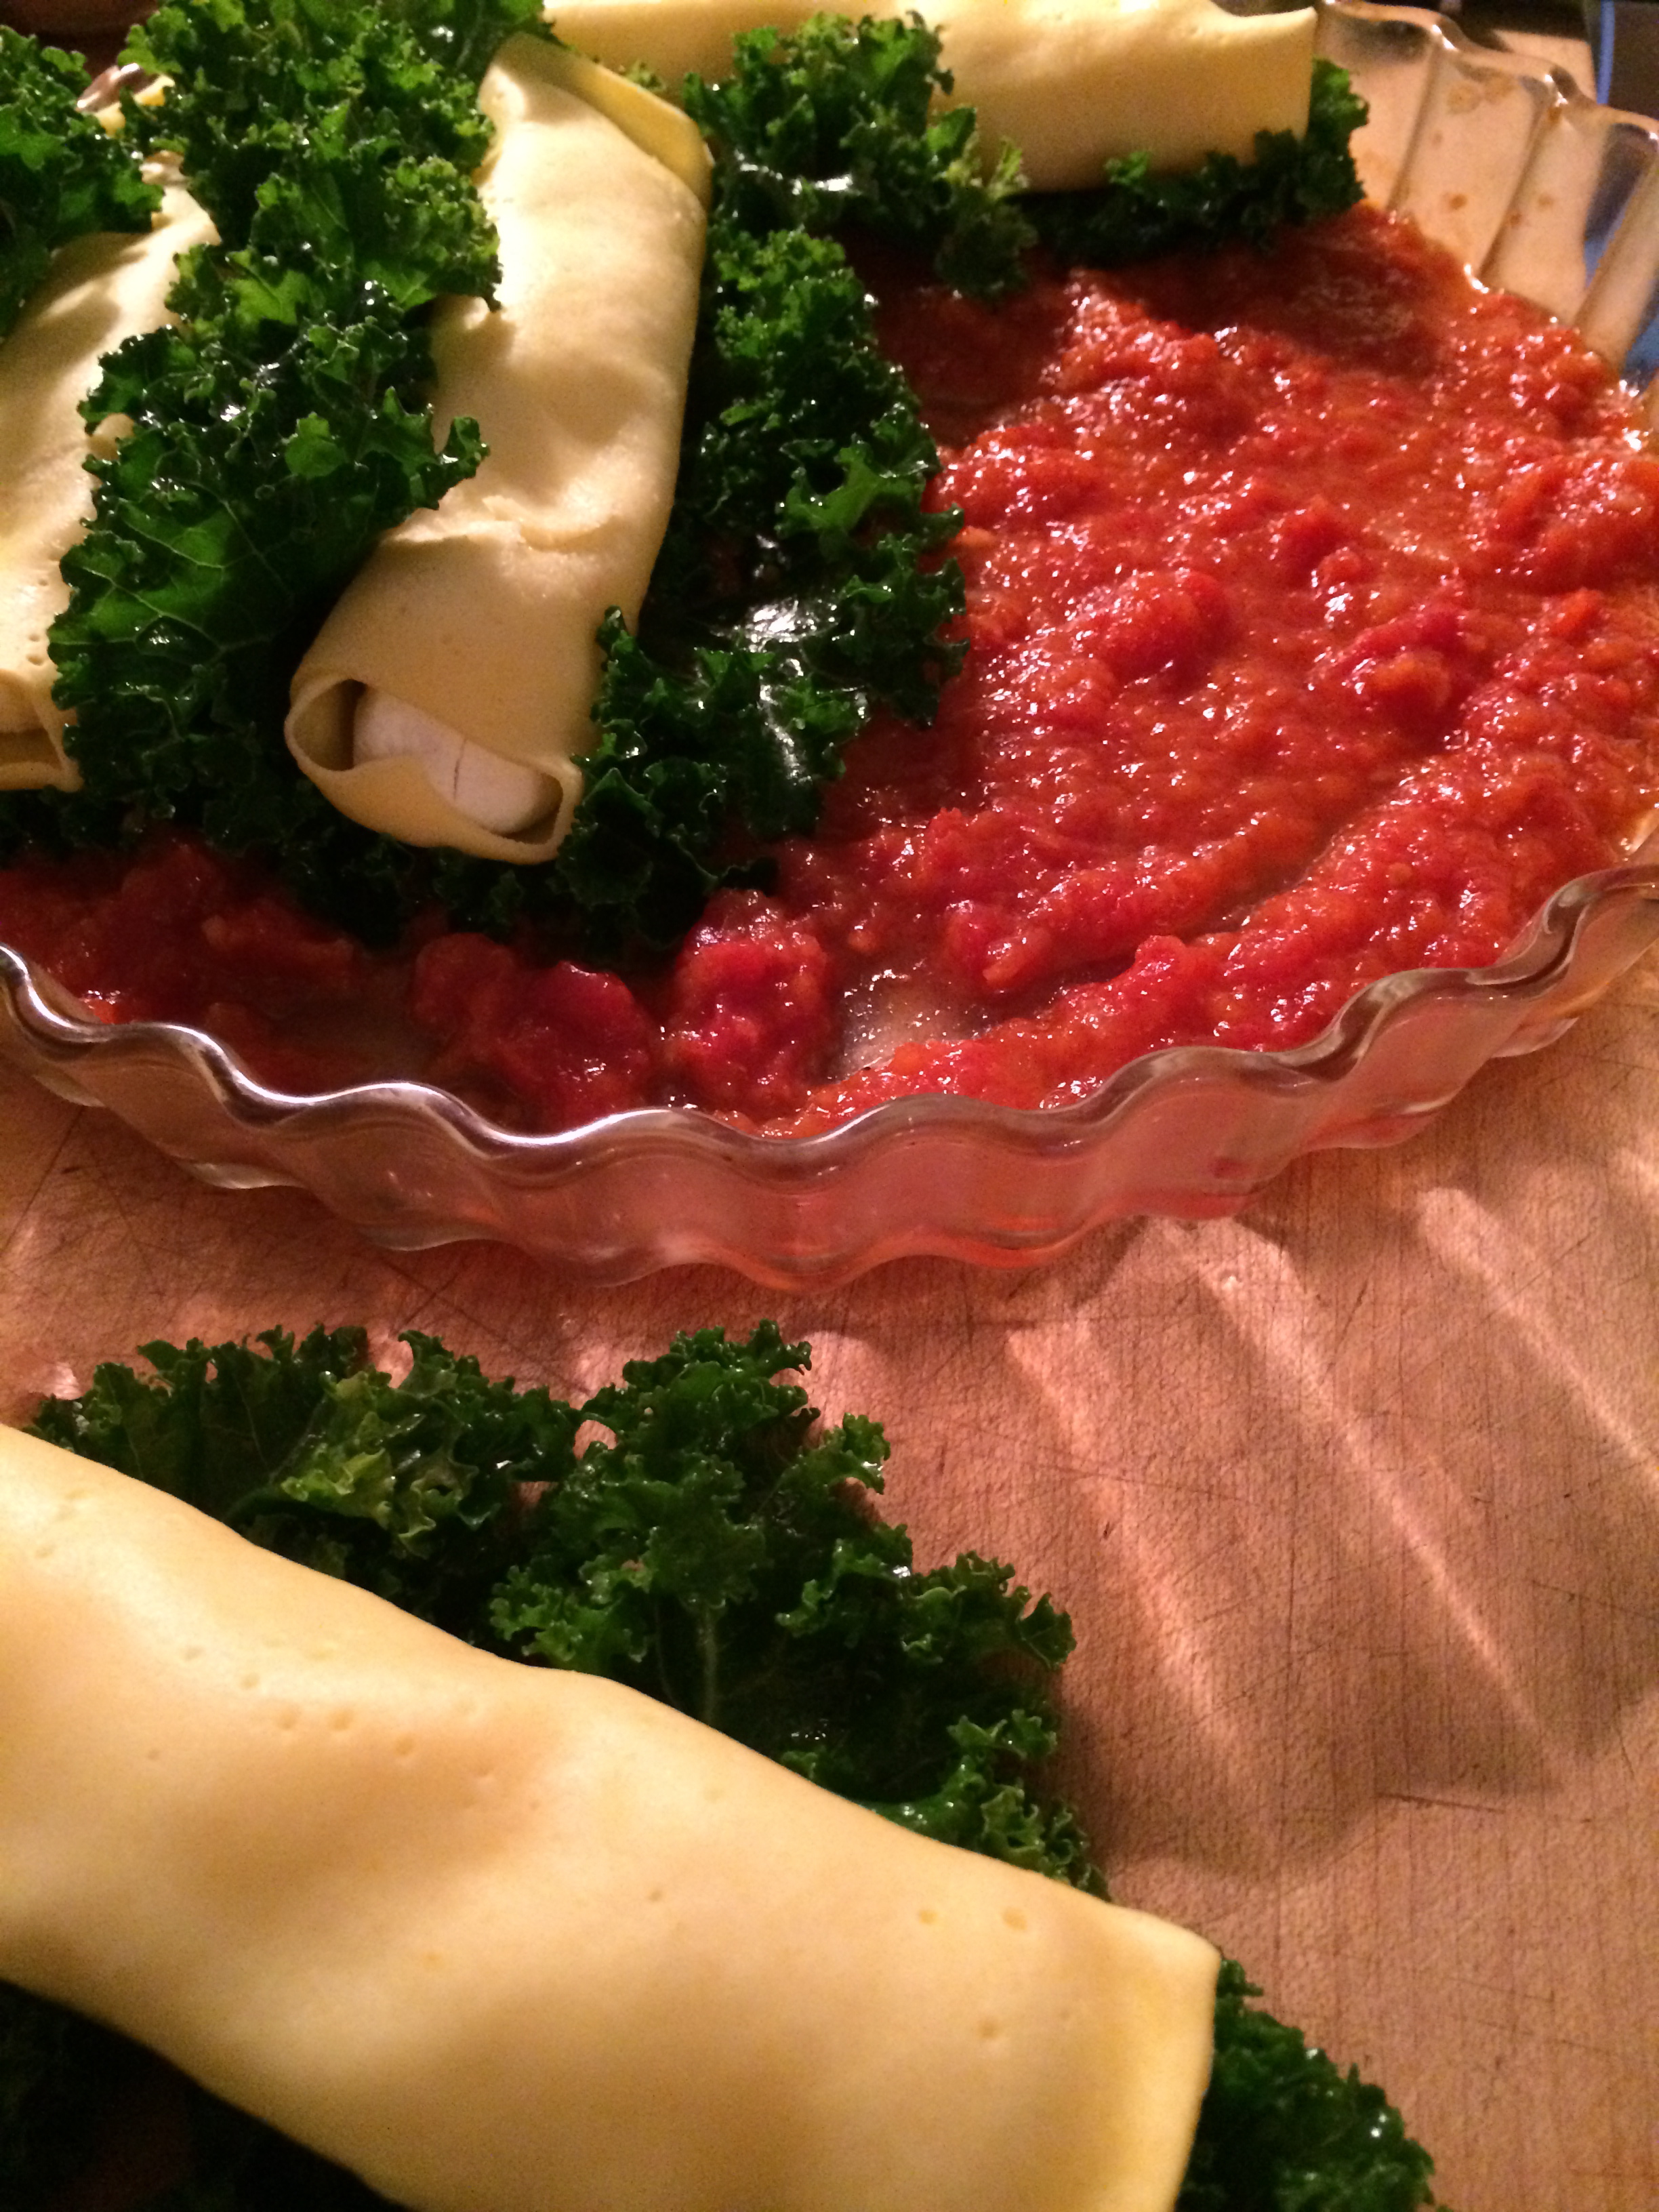
Wash and dry kale, and cut the rib off each leaf. Toss in a bowl with olive oil, vinegar and a light sprinkle of salt and massage lightly to coat. Partially wrap each manicotti in the seasoned kale leaves, leaving to top edge bare. Patching a few leaves together here is fine – try to get a lot of the nice frilly leaves top-side since these get wonderfully crunchy when they bake.
Lightly coat baking dish with olive oil and cover bottom with a thick layer of sauce. Arrange kale-wrapped manicotti in dish and spoon remaining sauce carefully over bare manicotti’s, leaving the edges to peek out a bit.
Lightly cover top with aluminum foil (do not tuck in). Bake for 30 – 35 minutes in 350° oven, until manicottis are hot through, sauce is bubbling, and kale is crunchy but still green.
Merry Christmas!
Vodka Sauce for Uncle Warren

Vodka Sauce used with Baked Manicotti with Kale
This is probably my all time favorite pasta sauce, taught to me over 20 years ago by my dear friend Silvia Pavani, one of the best cooks I have ever met. I am eternally grateful to her for infusing me with the joy and passion for great pasta (and great coffee!)
This recipe has probably deviated quite a bit over the years, since I just wing it every time I make it now. I was encouraged by Silvia’s own adventuresome spirit – she made this sauce without finishing it with heavy cream, as is traditional. She said it simply “wasn’t necessary” and I think she was spot on. I have never had a better Vodka sauce, and it’s easily made vegan.
It is a nostalgic recipe for me, full of old times and dear friends. It is a sauce full of love and memories. And recently I had the absolute pleasure of making it for my dad’s older brother, my Uncle Warren – an avid pasta fan who’s total delight in every bite made the recipe even sweeter. This one’s for you Uncle Warren!
(Pasta alla) Vodka Sauce
- 2 medium onions
- 1/2 cup water, plus more as needed
- 1/2 cup Vodka (split)
- 1/4 c butter (or substitute olive oil)
- 3 T olive oil
- pinch or two red pepper flakes
- 1/2 t salt
- 1 large (28 oz) can diced or whole tomatoes (Use high quality like Muir Glen)
- 1/4 c freshly grated Parmesan cheese (optional)
Prepare the Vodka Sauce:
 In a blender, puree onions, water and first 1/4 cup vodka until smooth. Set aside.
In a large, heavy skillet, melt butter and olive oil over medium heat. Add a pinch or two of red chile flakes and fry for a split second before pouring onion puree into the pan. Add salt and mix well to combine. Cook over medium heat for 10- 12 minutes, stirring occasionally, until all the water is evaporated and onion puree is mild and sweet. Do not brown. When the onions start to noticeably fry (listen to them!) after 7- 8 minutes and look like a paste,- then add a splash of water (2 T), stir to deglaze the pan, and let cook down some more. Hover, stir, let cook, taste, add water, let cook, hover, stir…I do this 3 – 4 times, depending on the sharpness of the onions. Be attentive and do not skimp on this step – the flavor and sweetness of the onions carries the whole sauce. It will take about 10 – 20 minutes.
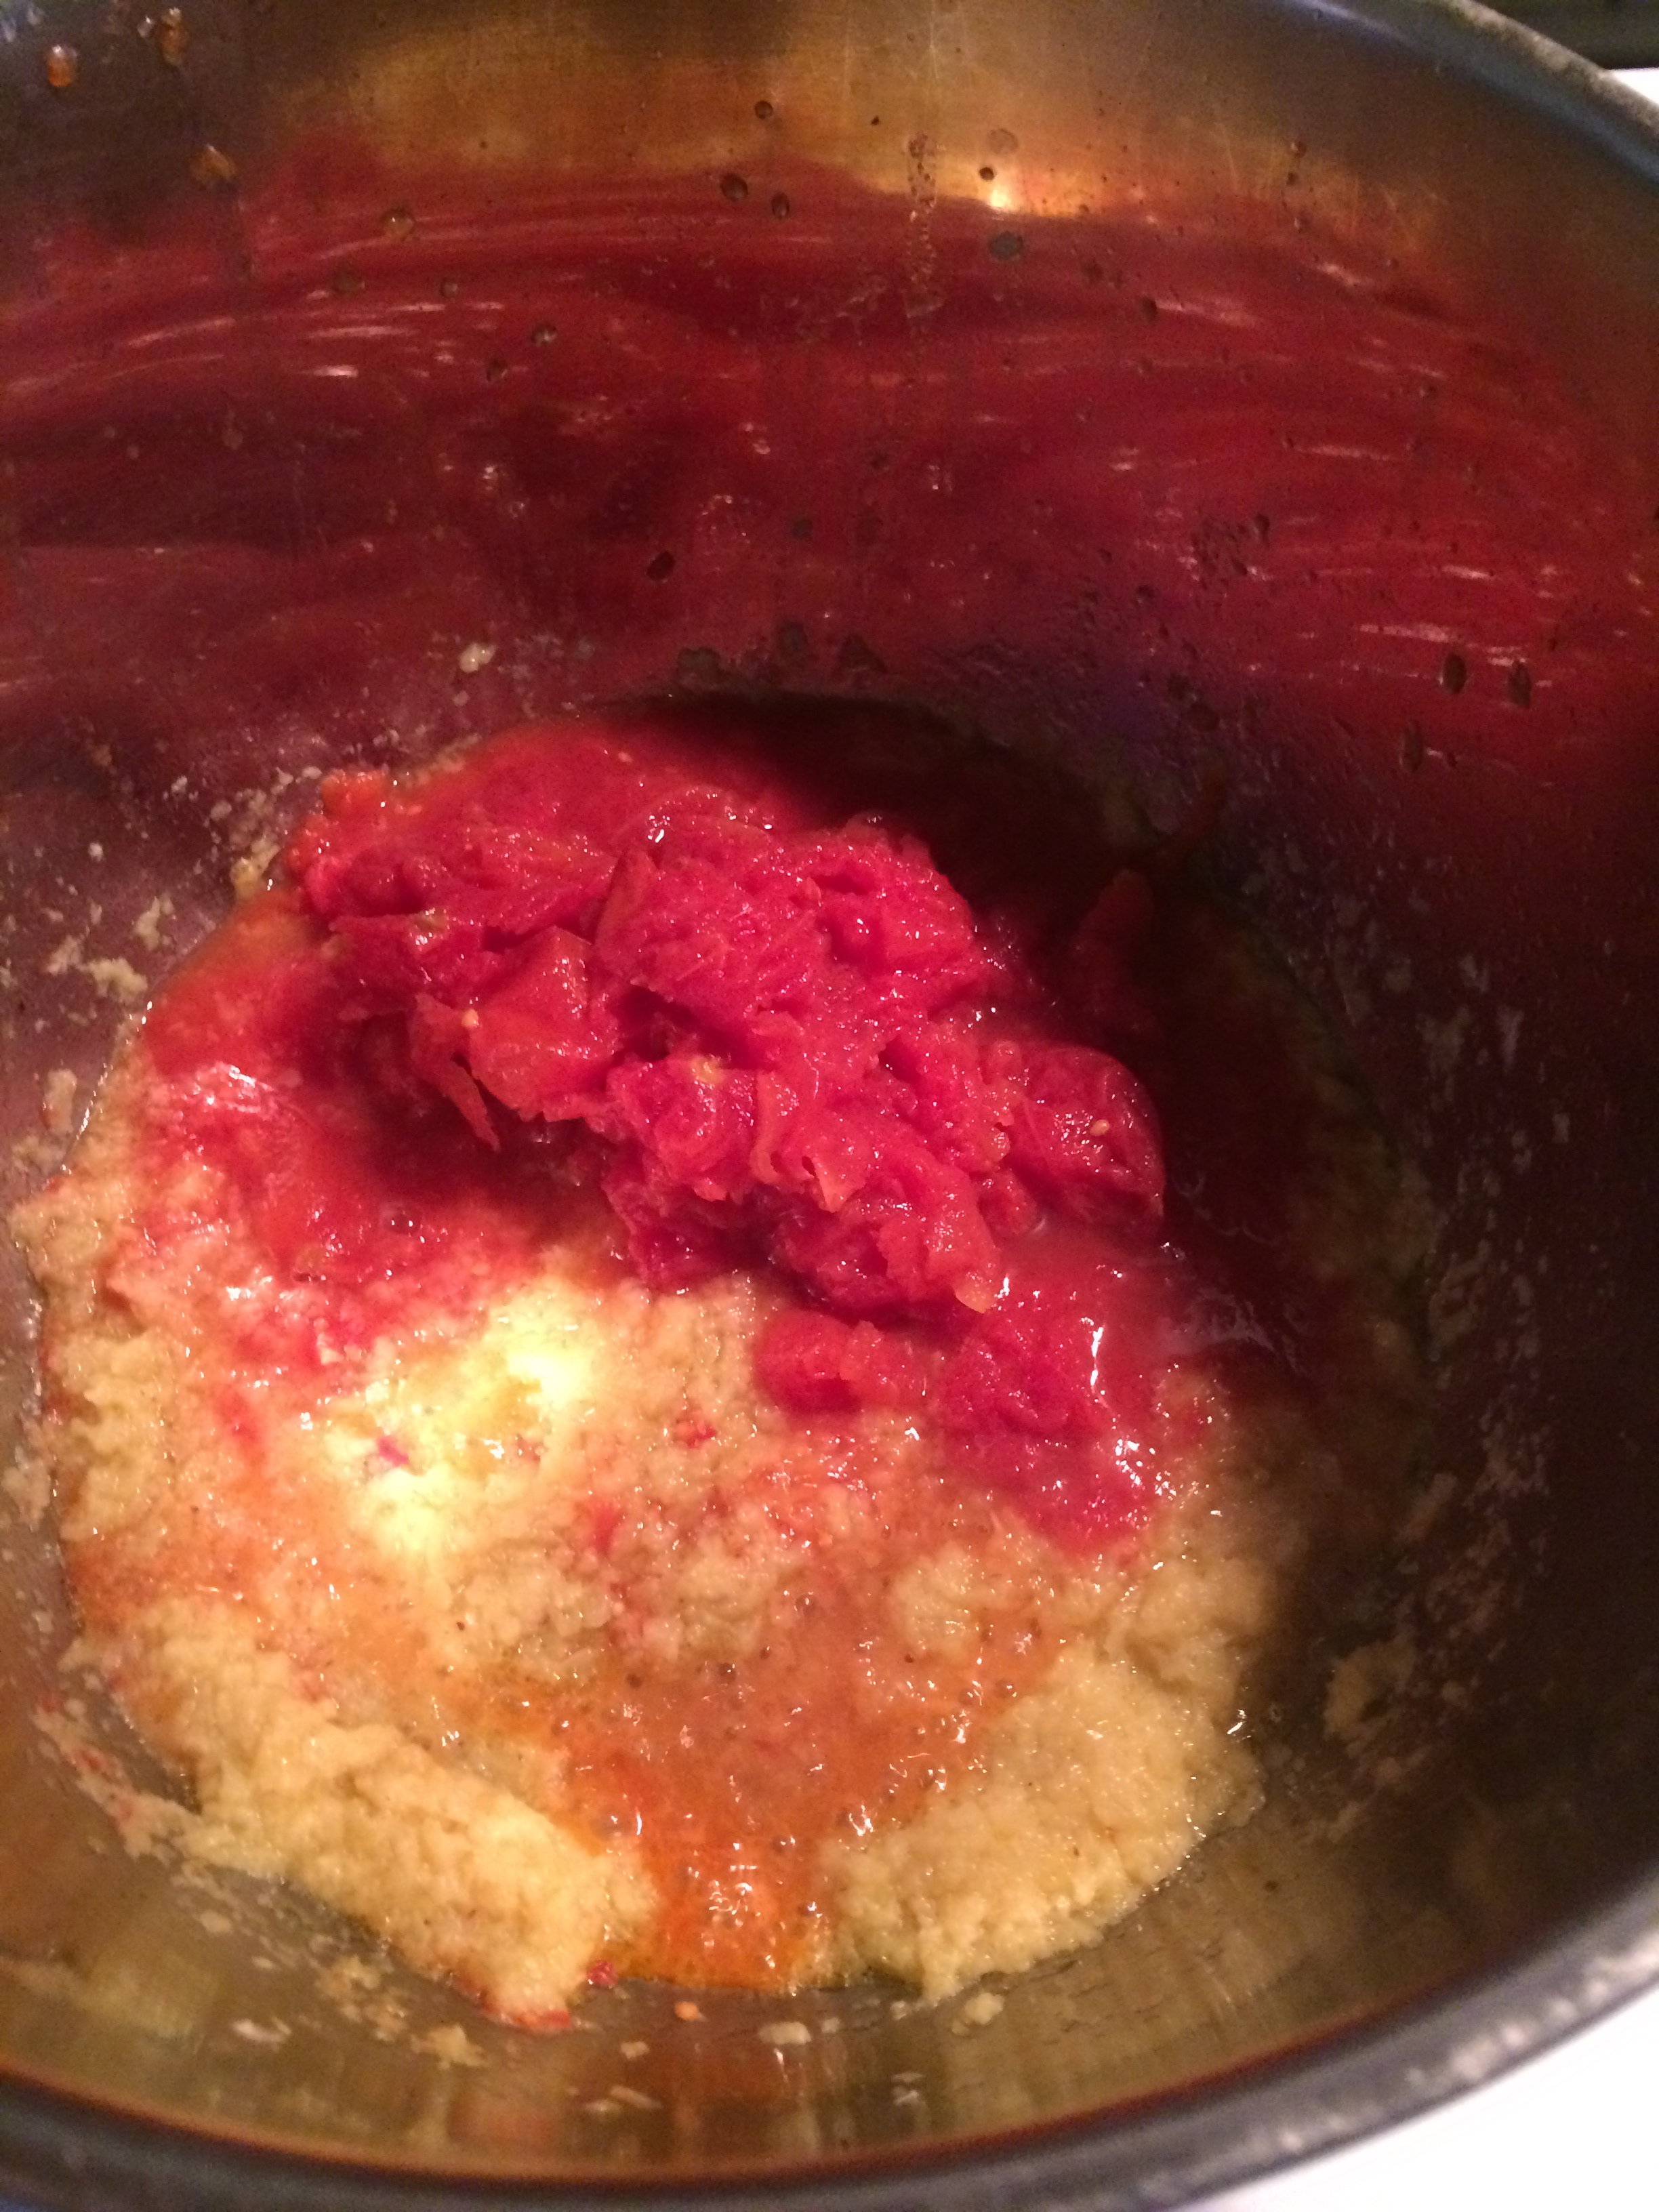
When all the water is cooked out and the onion paste is very sweet and has lost it’s bite, it is time to add the tomatoes: do this by reaching into the can with one hand and grabbing handfuls of diced or whole tomatoes and crushing them BY HAND, squishing them though your fingers into the bubbling onions. (Don’t ask me why this makes it taste good, but it does).
Hold back on adding in the juice until all the tomatoes are in the sauce: saute the tomato pulp for a minute, then add in juice from the can. Stir and cook over medium-high heat for about 4-5 minutes – this part goes quick. Taste and adjust for salt (you can use 1/4 – 1/2 t more here) If you are using good tomatoes, the sauce should be sweet enough, but add 1/2 t of maple syrup or coconut sugar if there is any hint of acidity left at this stage.
Turn off heat and add remaining 1/4 c vodka to pan. Stir well. The idea here is that MOST of the alcohol in the vodka will burn off with the heat of the sauce, but some of it will sneak into your tomato chunks and just make them indescribably yummy. Do not simmer this sauce to keep it warm – if you need to wait on the pasta, keep the sauce off the flame until the very last minute, then heat briefly just before serving.
I use this sauce in a number of recipes, including Baked Manicotti with Kale. But my favorite basic go-to pasta recipe is…
Pasta ala Vodka (for 4)
- 1 pound high quality pasta*
- High quality sea or other high-mineral salt
- Splash of olive oil
Somewhere around the time you start to cook the onions, get your pasta water going. Bring water to a rolling boil in a large pot and SALT IT WELL – it should be briny like the ocean. Please do this. It sounds simple and I know we American’s get fed all sorts of anti-salt propaganda, but trust me – well-salted water is the secret to great pasta. And great pasta is good for the soul.
Cook pasta al dente and drain immediately, return to pot and add a splash of olive oil to it. Toss in the pot to coat pasta in olive oil. If you salted the pasta water well, the pasta should be good enough to eat at this stage without any sauce at all.
Add sauce. 🙂 Toss briefly, adding grated Parmesan if using.
Serve immediately with extra Parmesan on the side. Buon Appetito!
*A Note on Pasta: I have recently been experimenting with gluten free pastas, and have found that the Tinkyada brown rice pastas are great. Feeding a regular crowd? Don’t tell anyone… they will never know.
Rich Spanish Lentils with Quinoa
 These lentils are so rich, hearty and satisfying – they can be served alone in a big bowl as a standalone Winter meal, or offered as a tasty first course to a larger meal, as it is often served in Spain. The addition of quinoa was inspired by the commonly used Spanish technique of starting many vegetable dishes by frying chunks of stale bread, or breadcrumbs in lots of olive oil, garlic and pimentón – the sweet, slightly smokey, Spanish paprika. The Castillian Sopa de Ajo, (Garlic Soup), is traditionally made this way. So it got me wondering what would happen to start with a base of quinoa, rather than bread…
So this soup is a hybrid between Sopa de Ajo Castellana, and the Andalusian Sopa de Lentejas, with my Californian non-gluten twist…
Spanish Lentil Soup with Quinoa – Serves 6 – 8
- 1 large onion, diced
- 1/4 c. extra virgin olive oil
- 4 garlic cloves, crushed
- 1/2 t. high quality, high mineral salt
- 1/2 t. freshly ground black pepper
- 2 carrots, diced
- 2 stalks celery, diced
- 1/2 cup dried quinoa, rinsed very well and soaked one hour or more
- 2 t. sweet paprika
- 2 t. Spanish pimentón
- 6 cups water or vegetable stock
- 1 T soy sauce
- 2 whole bay leaves
- 2 T nutritional yeast
- 1 t. ground cumin
- 1 t. salt
- 1 cup brown lentils, rinsed and soaked one hour or more
- 1/4 green bell pepper, or 1 jalapeno pepper, seeded
- 1 sweet potato, peeled and cut into chunks
- 1 potato, peeled and cut into larger chunks
- 1/4 c red wine, to taste
- 1/2 t. umeboshi vinegar, or Braggs Amino Acids (optional)
- 1/2 cup fresh flat leaf parsley leaves
Saute the onion with olive oil and a pinch of salt in the bottom of a large, heavy-bottomed soup pot, until golden brown and starting to caramelize – about 10 minutes. Add garlic, carrots, celery, salt and pepper and saute gently for about 10 more minutes until completely cooked, stirring occasionally and deglazing sides and bottom of pot with water every once in a whole as needed to keep it from sticking. This long slow cooking process at the beginning sweetens the vegetables and is what gives richness and depth to the soup, so make sure to put the time in here.
Stirring constantly over medium flame, add quinoa, paprika and pimentón, toasting the quinoa for a few minutes in the hot oil. Add water/stock, bay leaves, cumin, soy sauce and nutritional yeast, and 1 t. salt, lentils, green peppers, sweet potato and potato chunks. Bring to a boil and simmer gently for 30 -45 minutes, or until lentils are cooked but firm and potatoes can be cut with a fork.
Taste and add red wine and a splash of umeboshi vinegar or Braggs amino acids. (These give the “6th sense flavor” which the Japanese call umame. Soy sauce can also be used). Thin with water if necessary to desired consistency. These lentils can be served thin and soupy or very thick, piled up in a shallow bowl, depending on your preference. Adjust salt and freshly ground black pepper. Mix in fresh parsley just before serving.
These lentils are great with a side salad and thick slices of toasted garlic bread, or served alongside Tortilla de Patatas (a Vapor!).
Suryalila Vegetarian Paella
 Hola from the Suryalila Retreat Centre Kitchen! We are now officially up and running and we have just brought in Eduardo, an excellent new chef who will be running the kitchen while I am away. (I am planning to head back to the States next week to apply for my Spanish visa). It is sad to leave now – just when the retreat center kitchen is happily humming along, and the garden in starting to really take off, and we have all started to find our groove here running a brand new yoga retreat centre… but I also am looking forward to being home and enjoying Spring in NYC with Hannes.
In Suryalila, we have been gearing up for our first 3-week long yoga teachers training intensive with almost 30 people, which will start on Sunday. Everything has gone incredibly well here since we opened our doors last month – we have had 3 smaller yoga retreats and a steady stream of regular guests, which has given me exactly 3 Sundays to perfect my Vegetarian Paella technique!
I am so much better at doing things than explaining them… so I am sorry but this recipe is going to sound really complicated. It really is not difficult, but there are a lot of elements to it, so I guess it goes into the “Labors of Love” recipes category… which I just made. (This was previously called the “Dedicate Your Saturday” category, so now the gnocchi recipes have company on the weekends.) Also, as with every recipe, obviously you should feel free to adapt to what is in season, what you have on hand, etc. In Southern Spain right now, the fava beans are just coming out, oyster mushrooms and artichokes are plentiful, and wild asparagus is growing in the fields and beside the roads everywhere…
Vale…vámanos!
Suryalila Vegetarian Paella for 10
 Prepare all ingredients and set aside…
- 3 cups Bomba rice (similar to arborio rice, and traditionally used for Paella)
- 6 cups good vegetable stock, warmed with
- 1/2 teaspoon crushed saffron
- 1 cup fresh fava beans, peeled, lightly poached in salted water or broth until their skins split.
- 1/2 bunch asparagus, trimmed into 5 -6 inch lengths, and lightly coated in olive oil and salt
- 2 fire-roasted red peppers, one cut into long decorative strips, and 1 diced finely
- 8 -10 wedges of marinated artichoke hearts
 Marinate the Tofu (optional)…
- 1 pound of tofu, cut into 1/2 inch pieces
- 2 T olive oil
- 1/2 t oregano
- 1/2 t black pepper
- 1/2 t salt
- 3 T smoked paprika (or sweet)
Fry tofu in olive oil until slightly brown on some sides, add all seasonings and toast on low heat for a minute or two. Let marinade for up to a day at room temperature if possible.
 Sauté the Oyster Mushrooms…
- 1 pound oyster mushrooms, torn into pieces
- 2 T olive oil
- 1/2 t crushed garlic
- 1/2 t salt and pepper
Sauté oyster mushrooms slowly in a non-stick pan with olive oil, salt, pepper and garlic until browned and flavorful on all sides. If not using tofu, add paprika and oregano to mushrooms instead of tofu.
Make a Kick-Ass Sofrito…
- 1 cup onions, diced
- 2 T olive oil
- 1/2 cup green peppers, diced
- 1 T garlic, crushed
- 1/2 cup roasted red peppers, diced
- 1/4 cup parsley, chopped
- 2 cups cubed or crushed tomatoes, bottled or fresh
- 1 t salt
- 1/2 t pepper

In one medium-sized paella pan or large skillet, saute onions with olive oil and salt until soft. Add garlic, green peppers, finely diced roasted red pepper and saute for 5 or more minutes until soft and onions start to brown. Add chopped parsley and tomatoes to middle of pan and cook n medium flame for another 5 minutes or until the tomatoes start to caramelize slightly.
Add dry bomba rice and stir into sofrito until rice is thoroughly hot and just starting to stick to bottom of pan, (about 2 minutes).
Add hot saffron broth slowly to paella pan, allowing the broth to completely cover the rice. Add mushrooms and tofu and push them gently into rice and broth, without stirring. Shake pan to even out rice level and make sure the liquid just covers everything, adding more if necessary.
Cover paella pan with foil and allow to cook over a medium flame for about 10 minutes. Remove foil and arrange red pepper strips, artichoke hearts, and asparagus spears decoratively on top of rice. Sprinkle fava beans over top, cover again with foil and simmer slowly for another 10 minutes*, or until water is completely absorbed and rice is cooked al dente. Don’t be afraid to add a bit more broth if your paella is starting to get crispy on the bottom but is still not cooked on the top or sides.
* If your paella pan is much larger than your burner, place it on 2 lit burners for the last 10 minutes, and rotate every minute, so the sides of the pan also get cooked.
Stick a fork into the middle of the pan and try the rice to test if it’s done. The bottom should be sticking to the pan a little, and the top should be al dente, but not actually crunchy.
Take off heat, remove foil, and serve with lemon wedges. Buon Provencho!


Wild Nettle Gnocchi Adventures in Spain…
 “Hey – let’s walk out to the old convent to pick nettles and make stinging nettle gnocchi!” Krishana says…
How could I say no to that? Even though I have been in Spain for less than a week, and I am still living from a suitcase more or less camping out in a house strewn with unpacked furniture…and even though I only have a few weeks to get settled and get the new retreat center kitchen together, equipment purchased, people organized, supplies ordered…
 How could I say no? So we walked through the olive orchard (we have 350 trees!), over the neighboring wheat fields and to the god-only-knows-how-old crumbling ruin to which I look out upon from my bedroom window each morning. They call it The Convent. It is huge and roofless, with arched windows in the tower that look out over miles of surrounding countryside, including our property, Villamartin, Prado del Rey, and Arcos de la Frontera, a few the famous Andalusian white villages.
Inside, the entire ruin is completely full of waste-deep dark green stinging nettles! Armed with (almost-thick-enough) gloves, we harvest the lovely, giant, tender nettle leaves from the one shady corner, carefully picking just the leaves. Nettle flowers contain an irritant to the urinary tract, but the leaves and stems are surprisingly rich in protein (up to 25% dry weight) and full of iron, potassium, manganese, calcium, as well as vitamins A and C. Steamed, they are very tasty… like a soft, rich, extra-green tasting spinach.
 Krishana, who I come to understand is a bit of a celebrity gardener on Martha’s Vineyard, has taken it upon herself to create a giant organic vegetable garden for the Suryalila Retreat Center kitchen. In the two months since I was last here, has miraculously transformed about an acre of what looked to be hopelessly barren, rocky, dry soil into rows and rows of sprouting, peeking, microgreen potential! I mean, we are talking about rows of tatsoi, mizuna, spicy braising mixes, 3 or 4 types of kale, chioggia and bull’s blood beets… (wait – is that even vegetarian?). We are planting huge amounts of crazy gourmet vegetables, flowers, and herbs- some of which I have never worked with so I can’t wait until they all come up!
I have to say that Krishana is also the kind of person who is super fun, and who will always be getting you into trouble. I have known her for two days and already I know this – yesterday we were chased around by the local supermarket police, got almost lost several times trying to find our way back from town, and arrived back and the kitchen at 7pm which is when I should have had dinner finished. And now we are climbing through barbed wire fences to get to the elusive nettle patch when we are probably both supposed to be doing something more responsible… how great is that!
 So yes, I am finally here in Andalusia Spain! I will be here for 6 months to a year to start, setting up the Suryalila kitchen, cooking, blogging and, I suspect, soon embarking on a crash course in organic gardening. The property already has loads of fruit trees (lemons, tangerines, figs, cherry, peaches, apricots, quince and the Sevilla oranges) not to mention loads of olive trees and some almond trees, which are just starting to blossom. And now Krishana has planted almost an acre of organic vegetables which should take care of most of our veggie needs for most of the year. If not… well, there just happens to be an organic farming collective just 15 minutes away. Folks, we are going to eat well this year, so if you have ever harbored any fantasies about roaming the Andalusian countryside, picking oranges and almonds off the trees, drinking good (cheap!) Spanish wine, maybe doing a little yoga or horseback riding…all while enjoying amazingly fresh local organic gourmet cuisine… you might think about coming for a visit to Suryalila while I am here.
So, in celebration of our almost 1/4 acre of newly planted potatoes and to continue the gnocchi theme, here is recipe for potato gnocchi – the all day, even-though-it’s-not-Saturday type. We started with over 5 kg of potatoes, and after feeding a very enthusiastic crowd of 10, I have enough frozen for at least one more meal, maybe two. This recipe I adapted from Michael Chiarello’s potato gnocchi recipe, because it seemed to have a higher ratio of eggs than most. Did I mention that the fruit orchard is also a huge chicken yard, housing nearly 100 birds – chicken, geese, turkeys, and peacocks? We are now bringing about two dozen eggs a day, and because I don’t use a lot of eggs or dairy in my cooking, they are starting to pile up. (My new challenge this year with be in managing abundance!)
 So here is a great potato gnocchi recipe, to which I added the bounty of our our wild nettle harvest, with the result being the most lovely plump little green flecked dumplings you could ever imagine. Delicious and totally worth the work!
Wild Nettle Gnocchi for about 24
- 10 pounds potatoes
- 2 -3 cups coarse or kosher salt (not a typo)
- 15 egg yolks
- 5 cups all purpose flour
- 4 cups fresh nettle leaves, without stems or seeds
- Freshly ground pepper
Preheat oven to 425°
Blanch the nettles in about an inch of generously salted water. Drain, cool, squeeze dry and chop coarsely.
 Wash and bake the potatoes on a layer of course salt for 45 minutes or so until very tender, then peel the potatoes while still hot, being careful not to get too much salt into the whites. You can save the salt to use in the next batch. Press the potatoes through a mill or grate, (or mash by hand if you are ok with something a bit more rustic and lumpy – this is what I did and it was great). Taste for salt and add some if they don’t taste like… well, mashed potatoes. I found that after the salt baking and messy peeling process I did not need to add any more salt, but you are probably a neater cook than I am.
If the potatoes are still screaming hot, spread out to cool a bit so the yolks don’t cook, then, using a fork, gently work the eggs yolks into the warm but not hot potatoes, cutting them in and keeping it all as fluffy as you can. Dump a couple cups of flour on a worktable, top with your potato mixture and gently work in most of the flour, using your knuckles and hands to gently work and fold it in, (without really kneading it though). Scatter the chopped nettles over the dough and gently fold in a few times to partially integrate, leaving it a bit flecky. It’s nice to have bits of green here and there.
You may not need all the flour here, and you may need a bit more, but go for less if possible. This part is really “by feel” and its a great feeling so enjoy it! You should have something that is just barely a dough, and that you can roll into ropes as long as it is very well covered in flour. Split the dough into 4 pieces, and pat each piece into a 1 inch think rectangle. Slice 1 inch pieces off and roll them between your palms into 1/2 inch ropes, then cut again into 1 inch logs. You can leave these as little dumplings, or roll them off a fork, Italian Granny style…
Keep in a single layer on a well floured sheet-pan until ready to cook or freeze. If you are freezing, just put the whole pan in the freezer and bag up the gnocchi when frozen solid.
Cook gnocchi in small batches in boiling salted water for 1 -2 minutes after they bob to the surface of the pot. Drain well and toss in a pan with very good olive oil or butter and a little Parmesan, salt, and pepper, or serve with your favorite sauce.


About halfway through the process, I realized I had someone who did not eat wheat, but luckily I had a bit of potato left over so so I whipped together a gluten free gnocchi using rice flour. It worked amazingly well! Makes me want to try with corn flour, spelt, etc…
Gluten Free Wild Nettle Gnocchi for 2
- 2 cups salt-baked, mashed potatoes (see above)
- 1 cup rice flour
- 1 large egg plus 1 yolk
- 1/4 cup cooked, squeezed and chopped nettles (see above)
- pinch of salt if necessary
Make gnocchi as show above, but don’t worry about overworking the dough… you can’t. These will be a bit more delicate to cook, so its best to keep them in a simple log or pillow shape, rather than rolling them off the fork which makes them want to fall apart. Enjoy!
Gnocchi gnocchi gnocchi gnocchi gnocchi….
 Besides being really fun to say, and sort of mind-boggling to spell, gnocchi are really super fun to make. And, apparently, you can make them with pretty much anything. This winter, after years of being intimidated by the process but drawn to the allure of these puffy little dumplings, I finally decided to tackle them and pulled out my mom’s old fashioned potato mill from the pantry….
I started with what looked most legitimate – the über fussy potato ones from Nancy Silverton’s gorgeous new Mozza Cookbook. Because I am incapable of following a recipe verbatim, (even my own), and because I wanted to try making them using white whole wheat flour instead of white all-purpose, I second-guessed the recipe and added about 1/2 cup less flour than she calls for.
They were incredibly delicious – maybe one of the the most delicious potato things I have ever put in my mouth. But they were also almost too delicate, and could have used more flour in them for a bit more bite…(probably exactly what the recipe called for). Making potato gnocchi is really a project and the Mozza recipes are great – very detailed and wonderfully specific – so rather than trying to re-post my only slightly modified version of that recipe*, I am going to recommend that you get that book, which is loaded with other inspiring veggie recipes, and devote an entire Saturday afternoon to the Potato Gnocchi Gods as I did. It’s wonderfully satisfying.
On the other end of the spectrum – for everyday life – there is ricotta gnocchi, which are so ridiculously quick and non-fussy to make that a dinner for two can be pulled together in about 30 minutes. Probably less. These are really a different creature than the potato ones, even if they look the same. Whipping these off the fork last night with the help of a somewhat ambivalent 12 year old was a whole different dimension from the Saturday mega-project, which was a dedication to art and love. The ricotta dough is definitely less silky and refined, and these gnocchi of course will not give you the Sublime Potato Experience (if you are prone to that sort of thing). Nonetheless, they are possibly even more fun to make because they can be made so easily and spontaneously, and they are unpretentious enough to really be dressed up with any funky old sauce, or none at all. They are amazingly tasty just as they are.
 Fresh Ricotta Gnocchi in Herbs – for 4
- 2 cups whole milk ricotta, (organic, grass fed if possible)
- 2 whole eggs
- 1 cup freshly grated Parmesan (use a microplane)
- 1/4 t salt
- 1/4 t white pepper
- freshly grated nutmeg
- 1 1/4 cup white whole wheat flour, plus 1/2 cup for shaping
- 3 T. butter, olive oil, or a mix
- 1 T minced fresh herbs (rosemary, sage, thyme, or a combo)
- 1 T freshly chopped Italian parsley
In a medium sized bowl, combine ricotta, eggs, 1 cup Parmesan cheese, nutmeg salt and pepper. Still to combine thoroughly. Add flour and mix lightly to combine. Dough will be very soft.
Dump out onto well floured board, turn over and fold over very gently a few times just to fully integrate dough. Separate into two balls and, taking turns, shape and flatten each one into a 1 inch thick rectangle. Using a clean knife, cut 1 inch strips from this and gently, on a well floured board, roll each one out into a 1/2 inch thick rope of dough.
Cut the rope into 1 inch “pillows” and, using your thumb on the back of a fork, gently roll each gnocchi off the fork tines, creating ridges on one side and a bit of an indentation on your thumb side. Don’t be afraid to be liberal with the flour. Or, you can just forget the fancy fork thing and do some rustic “loggy” ones or whatever you like. Try some fishes! Just make batches in relatively all the same size so that they will cook at the same time.
Repeat shaping the remaining gnocchi, dropping the finished ones on a floured baking sheet in a single layer. These can be frozen like this, to be bagged up after they freeze or cooked immediately.
 In a well seasoned or non-stick skillet, heat butter, olive oil and minced herbs gently while you cook the gnocchi. Keep on low-med heat so the herbs get a little crunchy, but do not burn.
To cook, bring a medium sized pan of salted water to a boil. (The rule for fantastic pasta of any kind is to make the water as salty as the ocean, and to use high quality grey, sea, or Himalayan salt to do this with. Trust me, it’s worth it). Cook the gnocchi in 2 – 4 batches at a time, for only about 2 – 3 minutes after they float to the surface. Alternately, you can skip the cooking and try just pan frying them, but I found them a bit lighter if you boil them first.
Drain with a slotted spoon or strainer, adding all the cooked gnocchi to your skillet before tossing quickly and giving a slight reheat in the herb-butter. Finish with a touch of coarse salt, freshly ground black pepper, and parsley, and top each serving with a bit of grated Parmesan.
*The white whole wheat flour works surprisingly well in gnocchi! Substitute 1:1 for all purpose in the recipes. It’s delicate and just slightly nutty which works great with the butter sauce, and you know…if you didn’t know, you wouldn’t know.
Chile Relleno Casserole with Warm Tomato-Coriander Salsa
 OK, January in NYC and just finally snowed today after a freakishly warm couple of months that were supposed to be winter. And what I am thinking about? Mexico. 2 years ago exactly…laying in a hammock in an amazing little oasis in Tulum called Posada Yum Kin, which is the kind of place that once you discover, you have to work your entire trip around because you don’t want to leave. I have done a lot of tropical traveling in the last couple of years, but when I close my eyes and wish to be teleported off for a week to someplace utterly relaxing… this is where I think of. A hammock …and the watermelon margaritas at Salsalito Taco Shop. Not necessarily in that order.
I also had some of the best chile rellenos I have ever had on that trip, at a place called Wet Wendy’s on Cozumel. It’s a margarita bar right in the middle of tourista-ville which was so tacky I am afraid to link you there, but if you are ever on Cozumel you have to go for their chiles, which are just huge, divine, deep-fried goodness.
Apart from the name, this recipe has nothing to do with what they were doing. This is a hybrid between my mom’s chile rellenos, which she stuffed with a much lighter cheese mixture using fresh ricotta and onions, and my friend Linda Fry’s ingenious recipe which makes the whole thing into a baked casserole and avoids the nastiness of deep frying. Served with a Warm Tomato-Coriander Salsa, it is fresh and heavenly.

Baked Chile Relleno Casserole for 4
- 12 fire-roasted green chiles*
- 1 1/2 cup whole milk ricotta (fresh, organic, grass-fed if possible)
- 1/2 small red onion, diced
- 3 oz goat gouda, in 1/2″ cubes (or raw milk cheddar, or jack)
- 6 eggs, at room temperature
- 1/2 t Himalayan or sea salt
- 6 T white whole wheat flour (or unbleached white)
- 6 T water
Oil a 9 -12″ casserole dish with olive oil or butter. Preheat oven to 400°.
Stuff the Chiles: Mix together ricotta, cheese and red onions in a bowl. Stuff each chile with about 2- 3 tablespoons of the cheese mixture. Alternately, you can open and spread half the chiles in a single layer on a plate, top with the entire cheese mixture and layer the rest of the chiles on top, like a chile-cheese-chile sandwich. What is important is that you have the filling stacked up and ready to go before you do the egg batter.
Make the Egg Batter:
Carefully separate eggs into two large metal or glass mixing bowls, making sure to keep whites completely free of any oil or egg yolks. Beat yolks and salt with a whisk (or electric beater) until very light yellow and fluffy, about 5 minutes. Add flour and water and whisk lightly just to combine.


With a completely clean whisk, beat egg whites with a small pinch of salt to firm peaks. This should take only 3 -5 minutes, but should not be interrupted by anything once you start. (Ignore the phone. Make the Seventh Day Adventists ringing the doorbell wait.)
Fold whites lightly into egg yolks and spread half this mixture onto the bottom of your prepared casserole. Not missing a beat, top with your stuffed chiles, laying them carefully in a single layer over the eggs. Top this with remaining egg mixture and back for 20 – 25 minutes or until top is golden brown and puffy.
Meanwhile, answer the door, make the salsa…
 Warm Tomato-Corriander Salsa:
- 1 sweet yellow onion
- 1 can whole organic tomatoes (such as Muir Glen) or 8 fresh Roma tomatoes, peeled.
- 1 T olive oil
- 1/2 t cumin seeds
- 1/2 t whole coriander seeds
- pinch salt
- pinch red pepper flakes (optional)
- 1 t agave syrup, to taste
- 1/4 C fresh cilantro leaves
Slice onion into 2″ strips. Using your hands, crush the whole tomatoes into a bowl, saving the juice.
Heat oil in a saute pan, and toast whole spices for 10 -15 seconds until fragrant, add onions, salt and red pepper if using, and saute on med-high for 4 -5 minutes until onions are just starting to color at the edges. Add crushed tomatoes and juice and sauté for a few minutes before tasting and adding a touch of agave as needed. (The sauce should be just slightly sweet, but how much to add will depend on your tomatoes). Simmer gently for 10 -15 minutes to integrate flavors. Serve warm, adding whole cilantro leaves just before serving.
Serve Chile Relleno Casserole drenched with a generous ladle of tomato salsa over the top. Awesome with a few sprouted corn tortillas, guacamole, and a big colorful salad on the side.
¡Buen provecho!
*Roast the Chilies: I roast whole poblanos directly over the gas flame on my stove, turning to blacken all over, let steam in a covered bowl for at least 10 minutes, then peel and seed them. You can also lightly coat whole peppers in oil and pop them into a 450° oven until they are completely black on the outside, then do the same. Roasted and cleaned chiles freeze really well so do a lot and freeze in batches to enjoy in the winter. Or, you you can do what my mom always did, which is to use canned whole Ortega green chiles. If you do this, you might as well go totally deviant: use pepper jack cheese and spice up the sauce to give it some inside-out spiciness. Mmmm….

Pesto-Quinoa Stuffed Tomatoes with Roasted Portabellos
This is the recipe that made me like quinoa, maybe even love it: fluffy quinoa with asparagus drenched in basil pesto, good enough right there… but then served with fresh ripe tomatoes and warm roasted portobello mushrooms – it’s a knockout combination. I owe thanks to Chef Tracy Morrisette, whom I worked with at the Goddess Garden in Costa Rica earlier this year, who convinced me with this combination that quinoa could be fantastic. If you are (like I was) in the camp that quinoa is no better than glorified bird seed, this recipe will convert you. (Quinoa is actually a seed, not a grain – it is gluten-free, very high in magnesium (cardiovascular health) and also has more calcium, phosphorus, potassium, iron, copper, manganese, and zinc than most grains. It’s also naturally high in protein and fiber.)
This can be served nearly raw as a summer salad or lightly baked as a gorgeous entree…
Pesto-Quinoa Stuffed Tomatoes with Roasted Portobello (serves 4)
- 4 medium-sized vine ripe tomatoes, (or two large heirloom)
- 1 t extra virgin olive oil
- 2 cups cooked quinoa (for 8 minute recipe, see below*)
- 6 T creamy blue-green basil pesto (any version)
- 1 cup fresh asparagus, in 1″ pieces
- 1 t olive oil
- 2 T water
- juice and zest of 1/2 lemon (opt)
- 1 T nutritional yeast
- freshly ground salt and pepper
- 4 medium portobello mushrooms, thickly sliced
- 2 T extra virgin olive oil
- 1 T well aged balsamic vinegar
- 1 t maple syrup, palm sugar or agave (if balsamic is not well aged)
- Salt and black pepper
 Preheat oven to 450°.
Prep the tomatoes: Cut the tops off of medium tomatoes, or cut the big heirlooms in half, horizontally.With your fingers, gently scoop out all seeds and inner membranes of each tomato, leaving a hollow cup. Drizzle with olive oil, sprinkle with salt and pepper and rub in gently with your hands. Let sit while you prepare the quinoa.
Prep portobello: toss mushrooms with oil and vinegar salt and pepper until well coated all around. Taste and adjust – should be delicious already. Spread out in single layer on heavy baking pan.
Make Pesto-Quinoa Pilaf: Quickly saute asparagus with a small amount of olive oil, water and salt for 1 -2 minutes until slightly tender, toss with squeeze of lemon and zest. Toss in quinoa, nutritional yeast and warm through gently. Add pesto – taste and add salt and pepper as needed.
 Stuff each tomato or tomato half generously with quinoa pilaf. (If tomatoes are small they can be split into 4 quarters to accommodate more filling, but not necessary.) Organize in baking dish or sheetpan and place both portobello and tomatoes in very hot oven to roast for 10 – 15 minutes or just until tomatoes are hot through and top of pilaf has a touch of brown. Portobellos should be ready in about the same time but keep and eye on them.
I served with a lightly dressed arugula salad (arugula and a squeeze of lemon in the unwashed mushroom marinade bowl… ).
 ~~~~~~~~Other Versions: ~~~~~~~~~~~
Stuffed Tomato Salad – just don’t roast: serve room temp pilaf in the fresh tomato shells over arugula, with un-roasted marinated portobellos on the side.
Un-stuffed Salad: Forget the whole stuffing thing, and just serve a big scoop of warm or room temp pilaf over a plate or bowl of gorgeous sliced summer tomatoes.
Pesto Quinoa with Garlic Scapes: replace asparagus with fresh garlic scapes in above recipe.
~~~~~~~~~~~~~~~~~~~~~~~~~~~~~~
*Tracy’s 8-minute Fluffy Quinoa:
- 2 cups quinoa
- 2 cups water
- pinch sea salt
Wash quinoa several times to get rid of soapy taste. Cover in fresh water and let soak 1 hour or over night to activate enzymes (skip this if you are in a rush). Rinse one more time drain. Boil quinoa gently in small pot for 8 minutes only in salted water. (Yes, it’s really only 8 minutes and a 1:1 ratio- even a bit less if you are making a very large pot of 8 cups or more). Fluff with fork, cover tightly and let rest for 5-10 minutes more to totally fluff up and expand.
Raw Zucchini Lasagna
By popular request, here is the “Raw Zucchini Lasagna” recipe, which, while made with raw zucchini instead of pasta, was not a totally raw dish only because the spinach in Costa Rica is too bitter to serve raw. This recipe is based on Russell James’ raw lasagna recipe, the original which can be found on therawchef.com for free when you subscribe his raw food tips. I really respect Russell James – if you are new to raw food I HIGHLY recommend his Raw Chef Academy Homestudy Course – his videos are very professional and well presented, and the recipes are consistently reliable and good. I don’t think anyone out there is educating on raw food as professionally as he is.
Raw Zucchini Lasagna – Serves 10
While this recipe has many different components, it is actually very easy to put together and extremely flexible. The nut layer can be made with soaked macadamia nuts or pine nuts instead of cashews, the spinach layer can be made all raw instead of cooked, or be replaced with any other vegetable layer, or eliminated completely. You can leave the mushroom part out of the mushroom nut layer, or do a raw version, or leave the nuts out, or eliminate that whole layer as well and just use the cashew ricotta, pasta and tomato sauce. Get creative with what you have on hand. The lasagna can be made several hours in advance and held, but serve it the same day you make it because it is best fresh.
Raw Zucchini Lasagna “Pasta”
- 10 medium zucchini or goldbar squash, peeled
- 1 t olive oil
- 1/2 t salt
Using a mandolin or Chinese slicer or very sharp knife, carefully slice each peeled zucchini lengthwise into even 1/8 -1/4 inch slices. Only use the fleshy outside of each squash discarding or reserving the seedy core for another recipe. Gently rub salt and oil into all the slices, reserving the nicest, most lasagna-like “noodles” for the top. Let sit while you prepare the remaining fillings, tossing gently with your hands occasionally and letting excess liquid drain off.
Texture Tip: texture is everything here. The reason you peel these and the thickness of the slices all add up to a smooth, lasagna-noodle “mouthfeel”, which I think is the whole trick. You may have to adjust the thickness as you go to get it perfect – I find that thinner slices are nicer, but go too thin and you will lose the body after the squash marinates in the salt a bit. Play with it – you can always bury the ugly ones in the middle!
Cashew “Ricotta” for Lasagna
- 2T lemon juice
- 2T nutritional yeast
- 2 yellow peppers, seeded and chopped
- 2T fresh parsley
- 1T fresh thyme
- 2t salt
- 3 cups cashews, soaked 2 – 4 hours and drained.
- 1⁄2 c water if needed
- ½ c (optional) fresh chopped herbs (rosemary, parsley, thyme, basil)
Blend all in vitamix until smooth and creamy, starting with peppers and adding nuts at the end, and water only if needed. Fresh herbs can be added at the end if using. Set aside, use the (unrinsed) vitamix to make tomato sauce:
Sundried Tomato Sauce
- 11⁄2c sundried tomatoes, soaked for 1 hour or more
- ¼ small onion
- 2c tomato, seeded and chopped
- 4 t agave/honey or 2 soaked dates
- 11⁄2 T dried oregano
- 1t salt or to taste
- ¼ c olive oil
- 2T lemon juice
Process all in a food processor or vitamix until smooth, adjust for salt/sweet depending on how salty your sundried tomatoes are. Set aside while you make your mushroom filling:
Mushroom Nut Filling
- 2 pounds fresh mushrooms
- 4 cloves garlic, minced
- 2 T olive oil
- 1t salt
- 1t black pepper,
- 1T dried sage
- 11⁄2c sunflower seeds soaked 1 hour or more and drained
- 1c sun-dried tomatoes, soaked for 1 hour or more
- 2T dark/brown miso
- 2t dried oregano
- 2t dried sage
- 1T nama shoyu/soy sauce
- 1⁄2t cayenne pepper
- 1T olive oil
- 1T honey/agave nectar
- 1t sea salt
In food processor, chop mushrooms coarsely. Sauté with garlic in 2 T olive oil, salt, pepper and sage, for 5 – 10 minutes until liquid is absorbed and mushrooms are very flavorful. Alternatively, for a truly raw version, spread evenly on dehydrator sheet and dehydrate for 2 – 3 hours until lightly “cooked”.
In food processor, blend nuts and remaining ingredients until combined but slightly chunky still. Combine with mushrooms. Set aside in dehydrator or warm place while you make your spinach filling:
Spinach and Onion Filling
- 2 large onions
- 1 pounds fresh spinach leaves, washed and chopped
- 1 t salt
- 2 T olive oil
Sauté onions in olive oil, salt and pepper until translucent, add spinach and sauté 5 – 10 more minutes until gently cooked. Cool slightly in colander, squeezing lightly to drain excess liquid. Alternatively, to make raw, toss raw spinach with other ingredients and massage gently to soften.
Assembling the Lasagna….
Spread one cup of tomato sauce on the bottom of a large casserole dish, preferably glass. Top with one even layer of zucchini pasta, overlapping each slice slightly. Top with one thick even layer of mushroom filling.
Add a second layer of zucchini (use the ugly ones here and make sure you have enough for one more layer of nice ones for the top. You can skip this layer if you don’t have enough for both.
Top second layer of zucchini with the cashew ricotta, dot with spinach. Top with final top layer of zucchini. Smooth remaining tomato sauce over the top. Cut carefully into 10 -12 pieces with a serrated bread knife and keep warm in dehydrator or low oven until ready to serve.
Creamy Parsnip “Fettucine” with Marinated Mushrooms (Raw)
This is blow your mind delicious alternative-to-pasta dish. Its easy to make but you have to get into the “Zen of Parsnip Peeling”…or have a couple of kitchen helpers around – it’s fun to do with friends!
Parsnip Pasta (Serves 4)
I love parsnips! They seem to be a very under-rated vegetable since no one seems to know much about them. They are wonderfully sweet and have a mellow wintery satisfying flavor and if you peel them into Fettuccine-like noodles with a simple vegetable peeler, they develop a delicious silky mouthfeel that is completely satisfying with a rich creamy nut sauce.
Texture Trick: the trick to the vegetable pastas is in how you cut it. You much slice or peel with the grain of the parsnip (or zucchini, or goldbar squash). DO NOT use one of those cool spiral slicer gizmos to make a vegetable pasta. Cool as it may look, those slicers will cut through your vegetables against the grain, resulting in a rough and mealy mouthfeel which is not good for a pasta dish.
- 8 medium sized parsnips, thoroughly peeled to take off all the tough skin.
- 1 zuchinni or goldbar squash, very lightly peeled, just to take off the smooth outer skin
- 1/2 t salt
- 1/2 cup dry white wine
- 2 T olive oil
- freshly ground black pepper
Peel the parsnips into fettucine shaped “pasta” the same way you would peel a carrot, rotating the parsnip by small turns until you run into the core. Keep peeling away as long as the parsnip is sweet and tender. Depending on the parsnip this might be the whole thing, or you might have to stop at the core which is sometime woody. (yes – you will have to keep munching on the raw parsnip as you prep… watch out, it’s habit forming).
Peel the zucchini into fettucine the same way, stopping short of the seedy core. We are just going for texture here.
Add salt and gently massage into the tangled mass of shredded veggies until they begin to soften and get slippery. This helps to break down the viberous nature of the vegetables and to give it that nice, smooth “cooked” feel in your mouth.
Now add the wine and the olive oil and massage in for a minute or two. Taste for salt, add pepper. It should be completely delicious even at this stage.
Let sit at room temperature for at least an hour for vegetables to soften and marinate in the wine. You can do this up to 24 hours ahead.
Marinated Mushrooms
- 1/2 lb brown crimini, king oyster, or mix of other fresh wild mushrooms, cleaned.
- 1 T lemon juice
- 1/4 c olive oil
- 1/2 t finely crushed garlic
- 1 T finely chopped fresh parsely
- course salt and freshly ground pepper to taste
Cut mushrooms into thick slices or bit sized chunks and toss with remaining ingredients- massage marninade into mushrooms gently with your hands for one minute. Adjust for taste (it should already be delicious at this stage).
Warm in dehydrator for 1 – 3 hours until mushrooms are soft and sauteed tasting. (Dehydrating is optional – you can simply leave out at room temperature and it will taste great).
In a large serving platter, top pasta with Raw Rosemary Cream Sauce, and finish with a heap of mushrooms in the center. Enjoy!
Note: any leftover parsnip pasta can be made in the base for the Warm Winter Carrot Soup.
