Home Cured Olives – Sonoma County Style…
Well… let’s just say it’s been a long time, but I have been keeping busy.
October is when the olive harvest begins in Suryalila and it is one of my favorite times of year to be there. And so when this October rolled around and I was far away from Spain, I thought I’d better see what California has to offer…
As some of you know, I have been making a slow transition this year from New York City back to Northern California, which is where I grew up. I really never intended to move back, but my father is losing his eyesight to macular degeneration, so I have been bouncing back and forth all year between my dad and his lovely 3 acre property in Northern Sonoma County, and my boyfriend Hannes in our home in Harlem, NY. To say this is a culture shock would not do it justice, but actually, I am getting used to it and am now enjoying the radical change of pace, in both directions.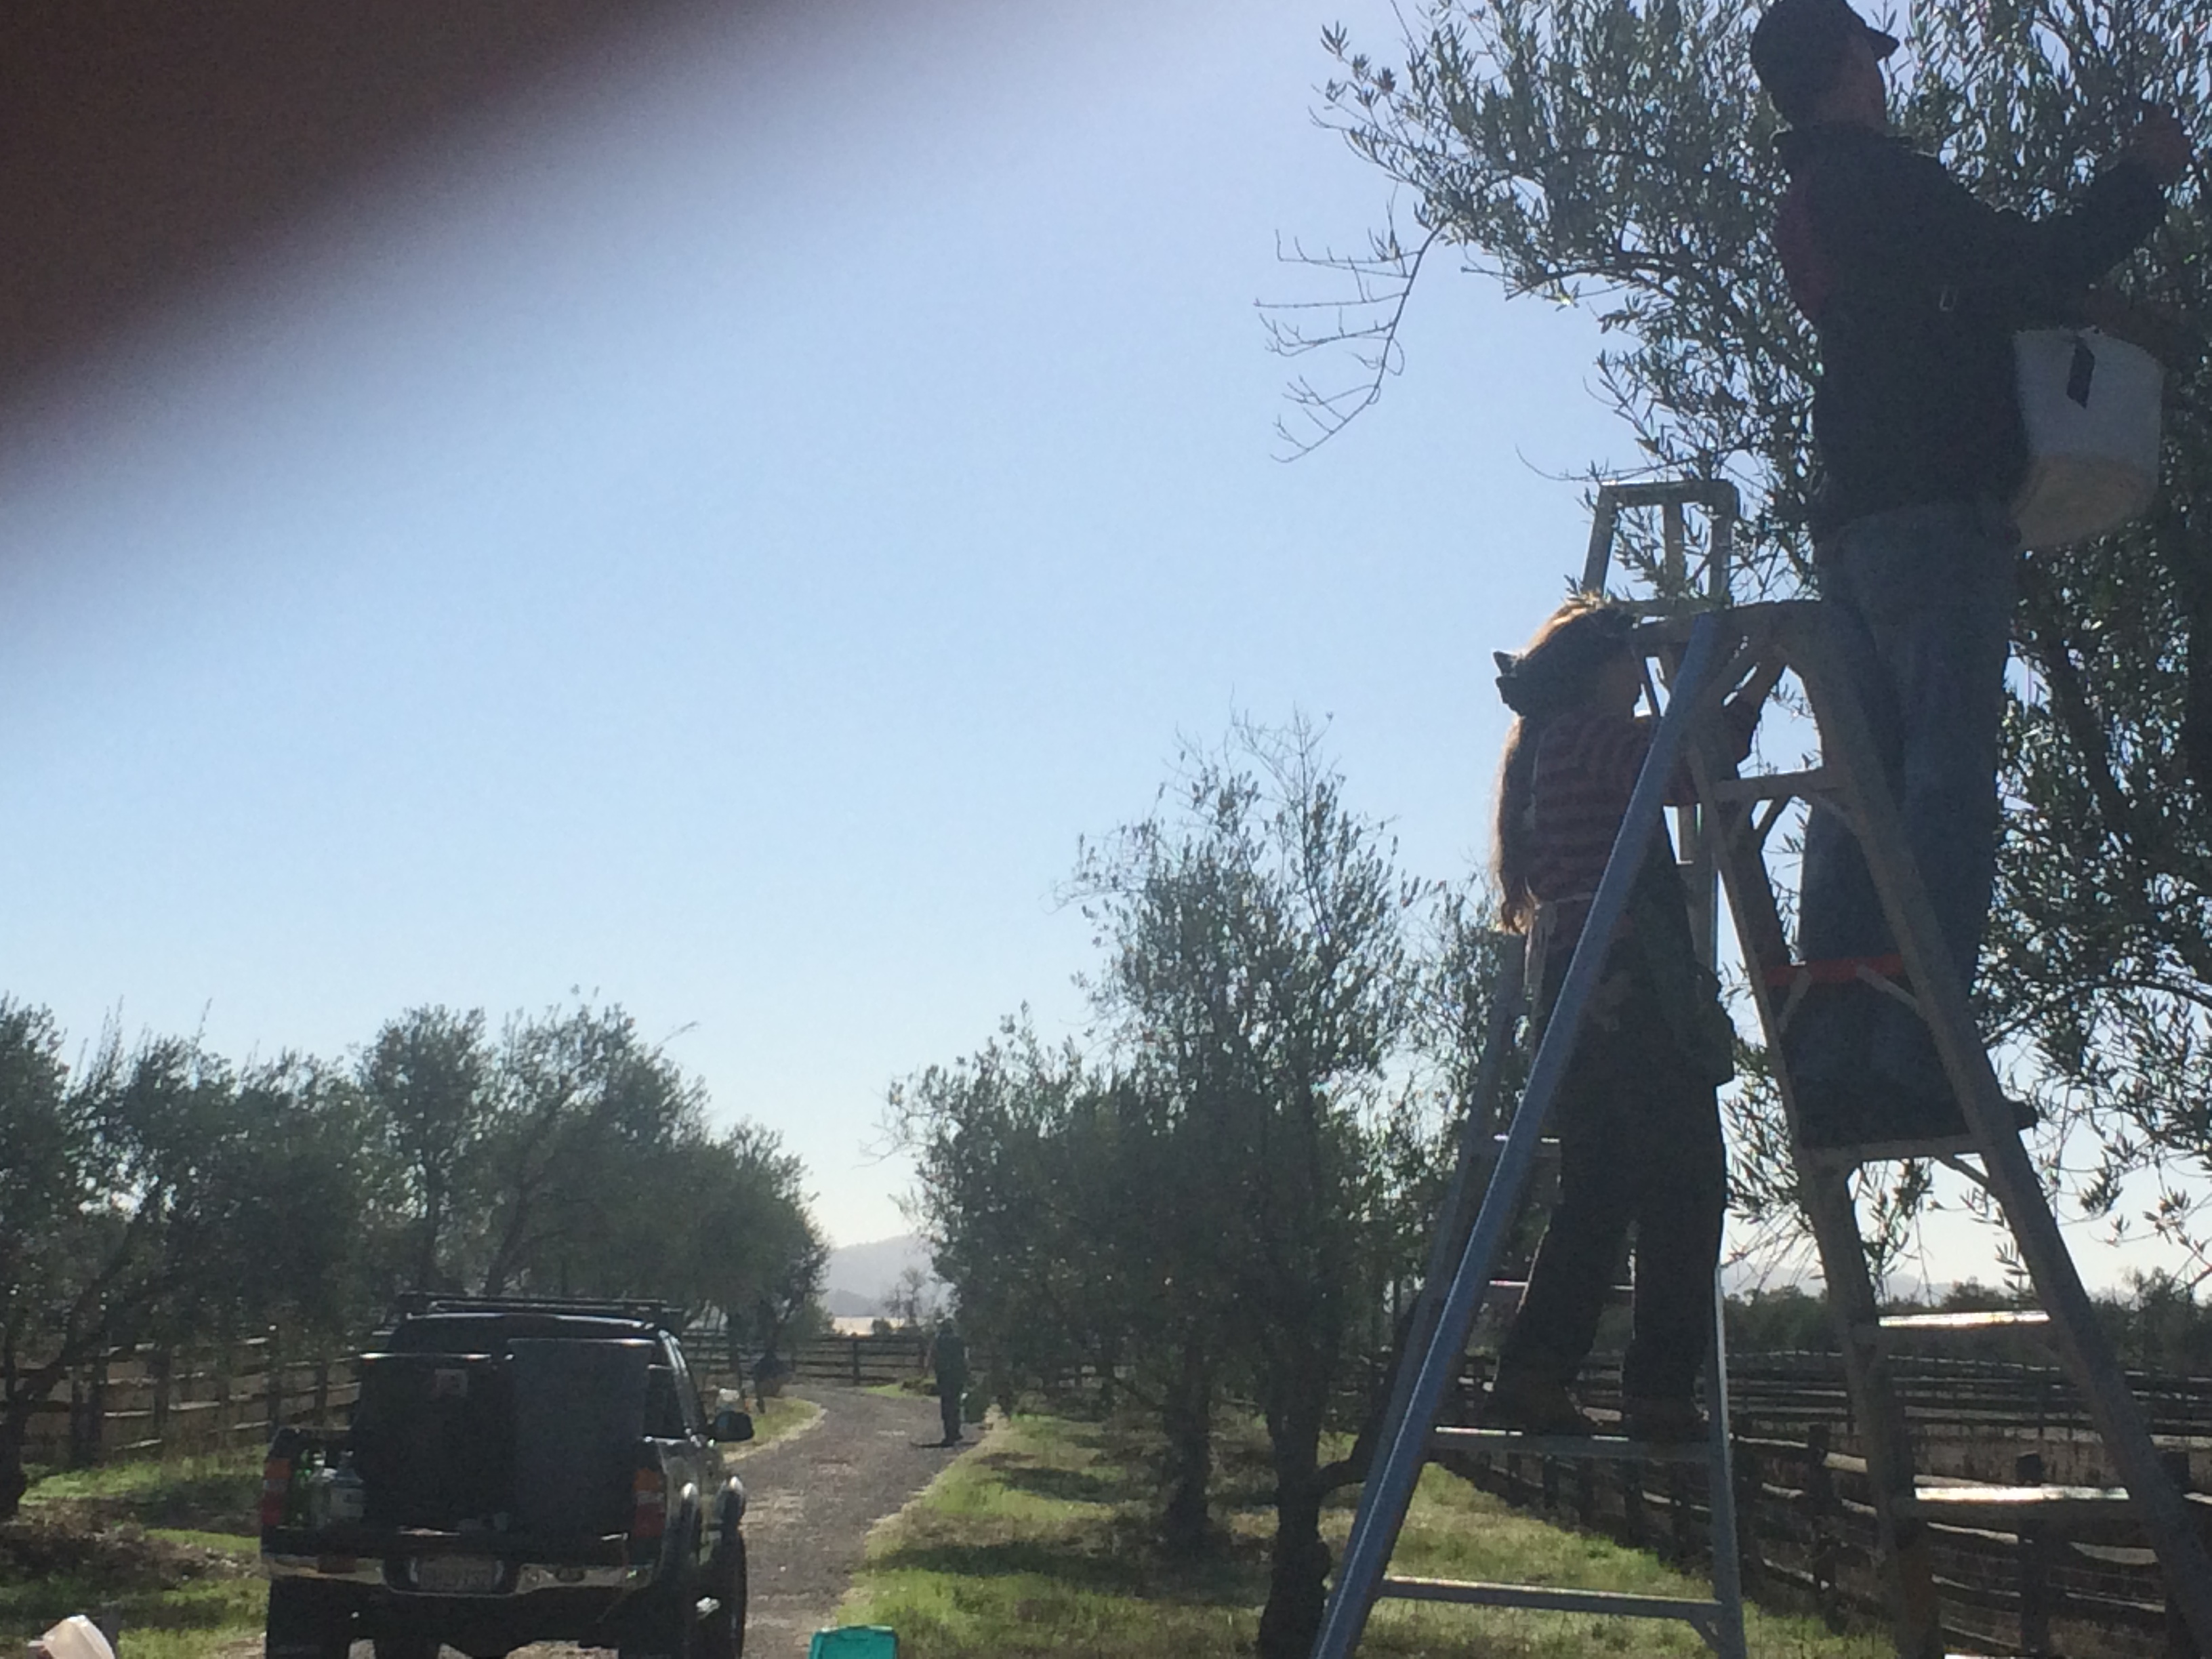
Needless to say, Sonoma County is an exceptionally beautiful place to live, and I am beginning to develop a real appreciation for the year-round farmer’s markets and the endless opportunities to grow, forage, brew, and preserve the bounties of the county. My father’s property is flanked by wineries on both sides; the road we live on was once called Oat Valley Road, and the next town West of us is called Hopland, so clearly, brewing and fermenting are in the air here. When you drive through Hopland, you see hops growing along side the road, and driving along Highway 101 in the Fall, the air is thick with the smell of must from fermenting grapes… it’s intoxicating!


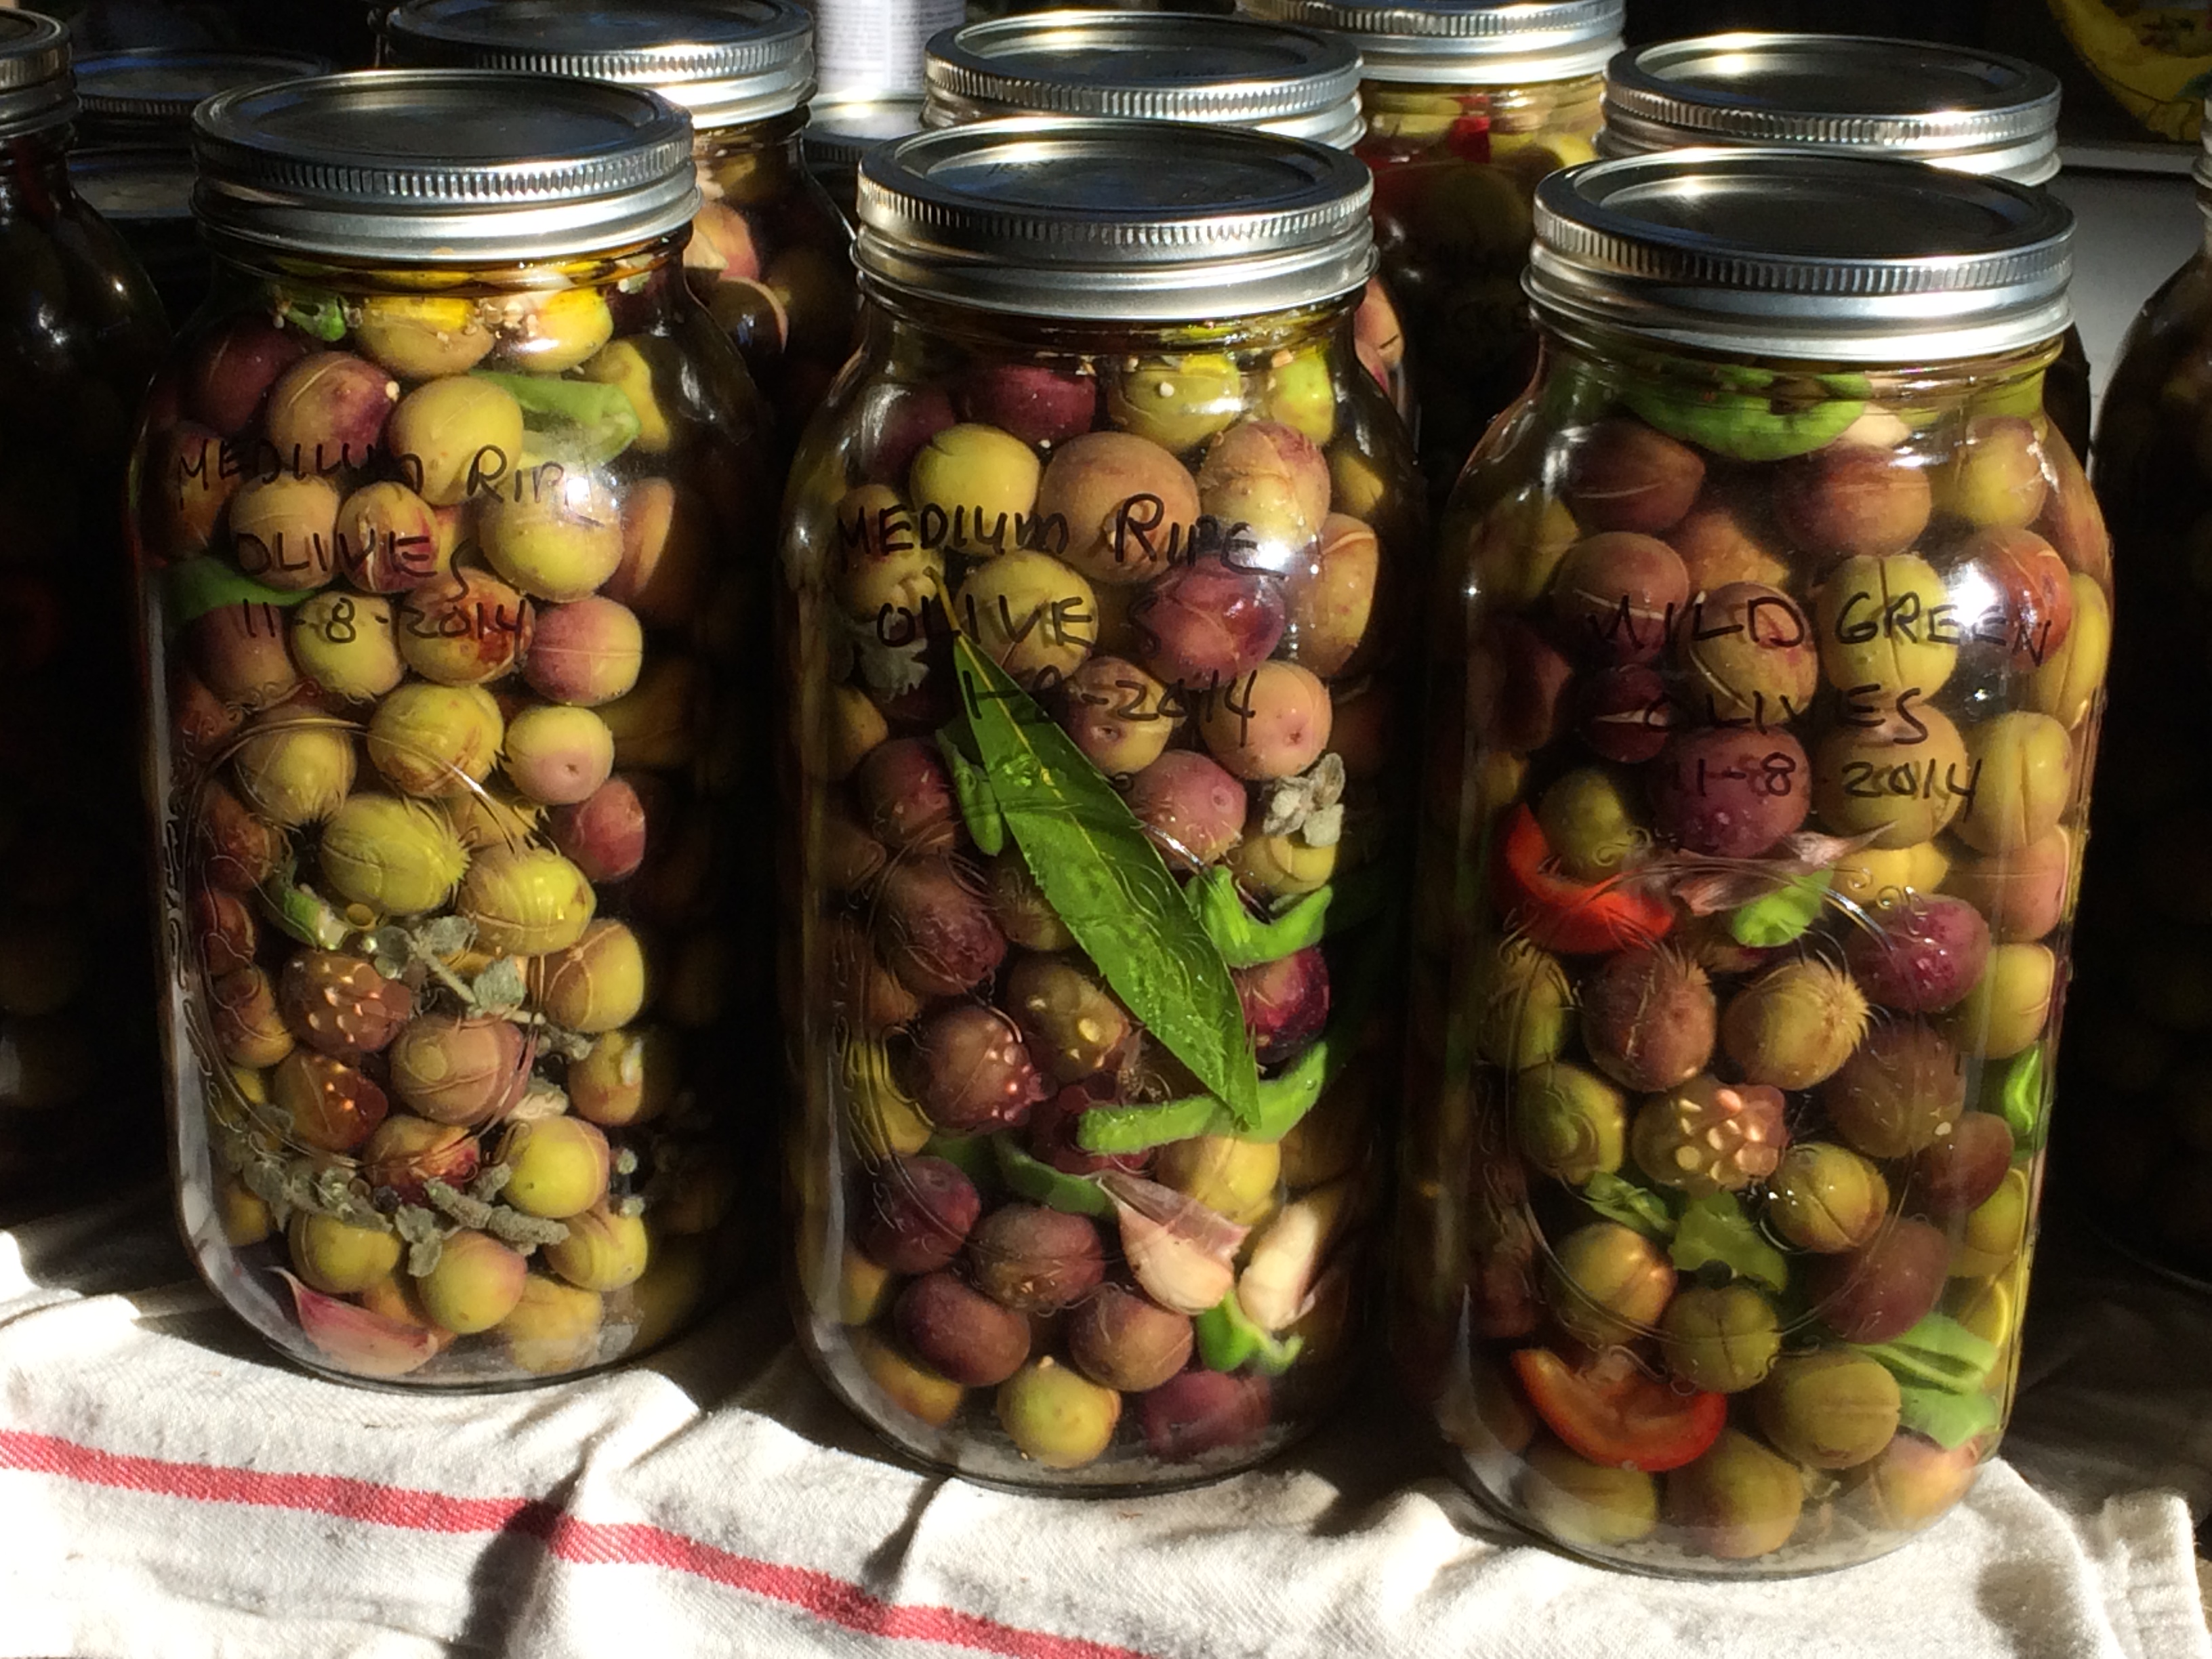
And… what is lining all these the vineyards? Olive trees!
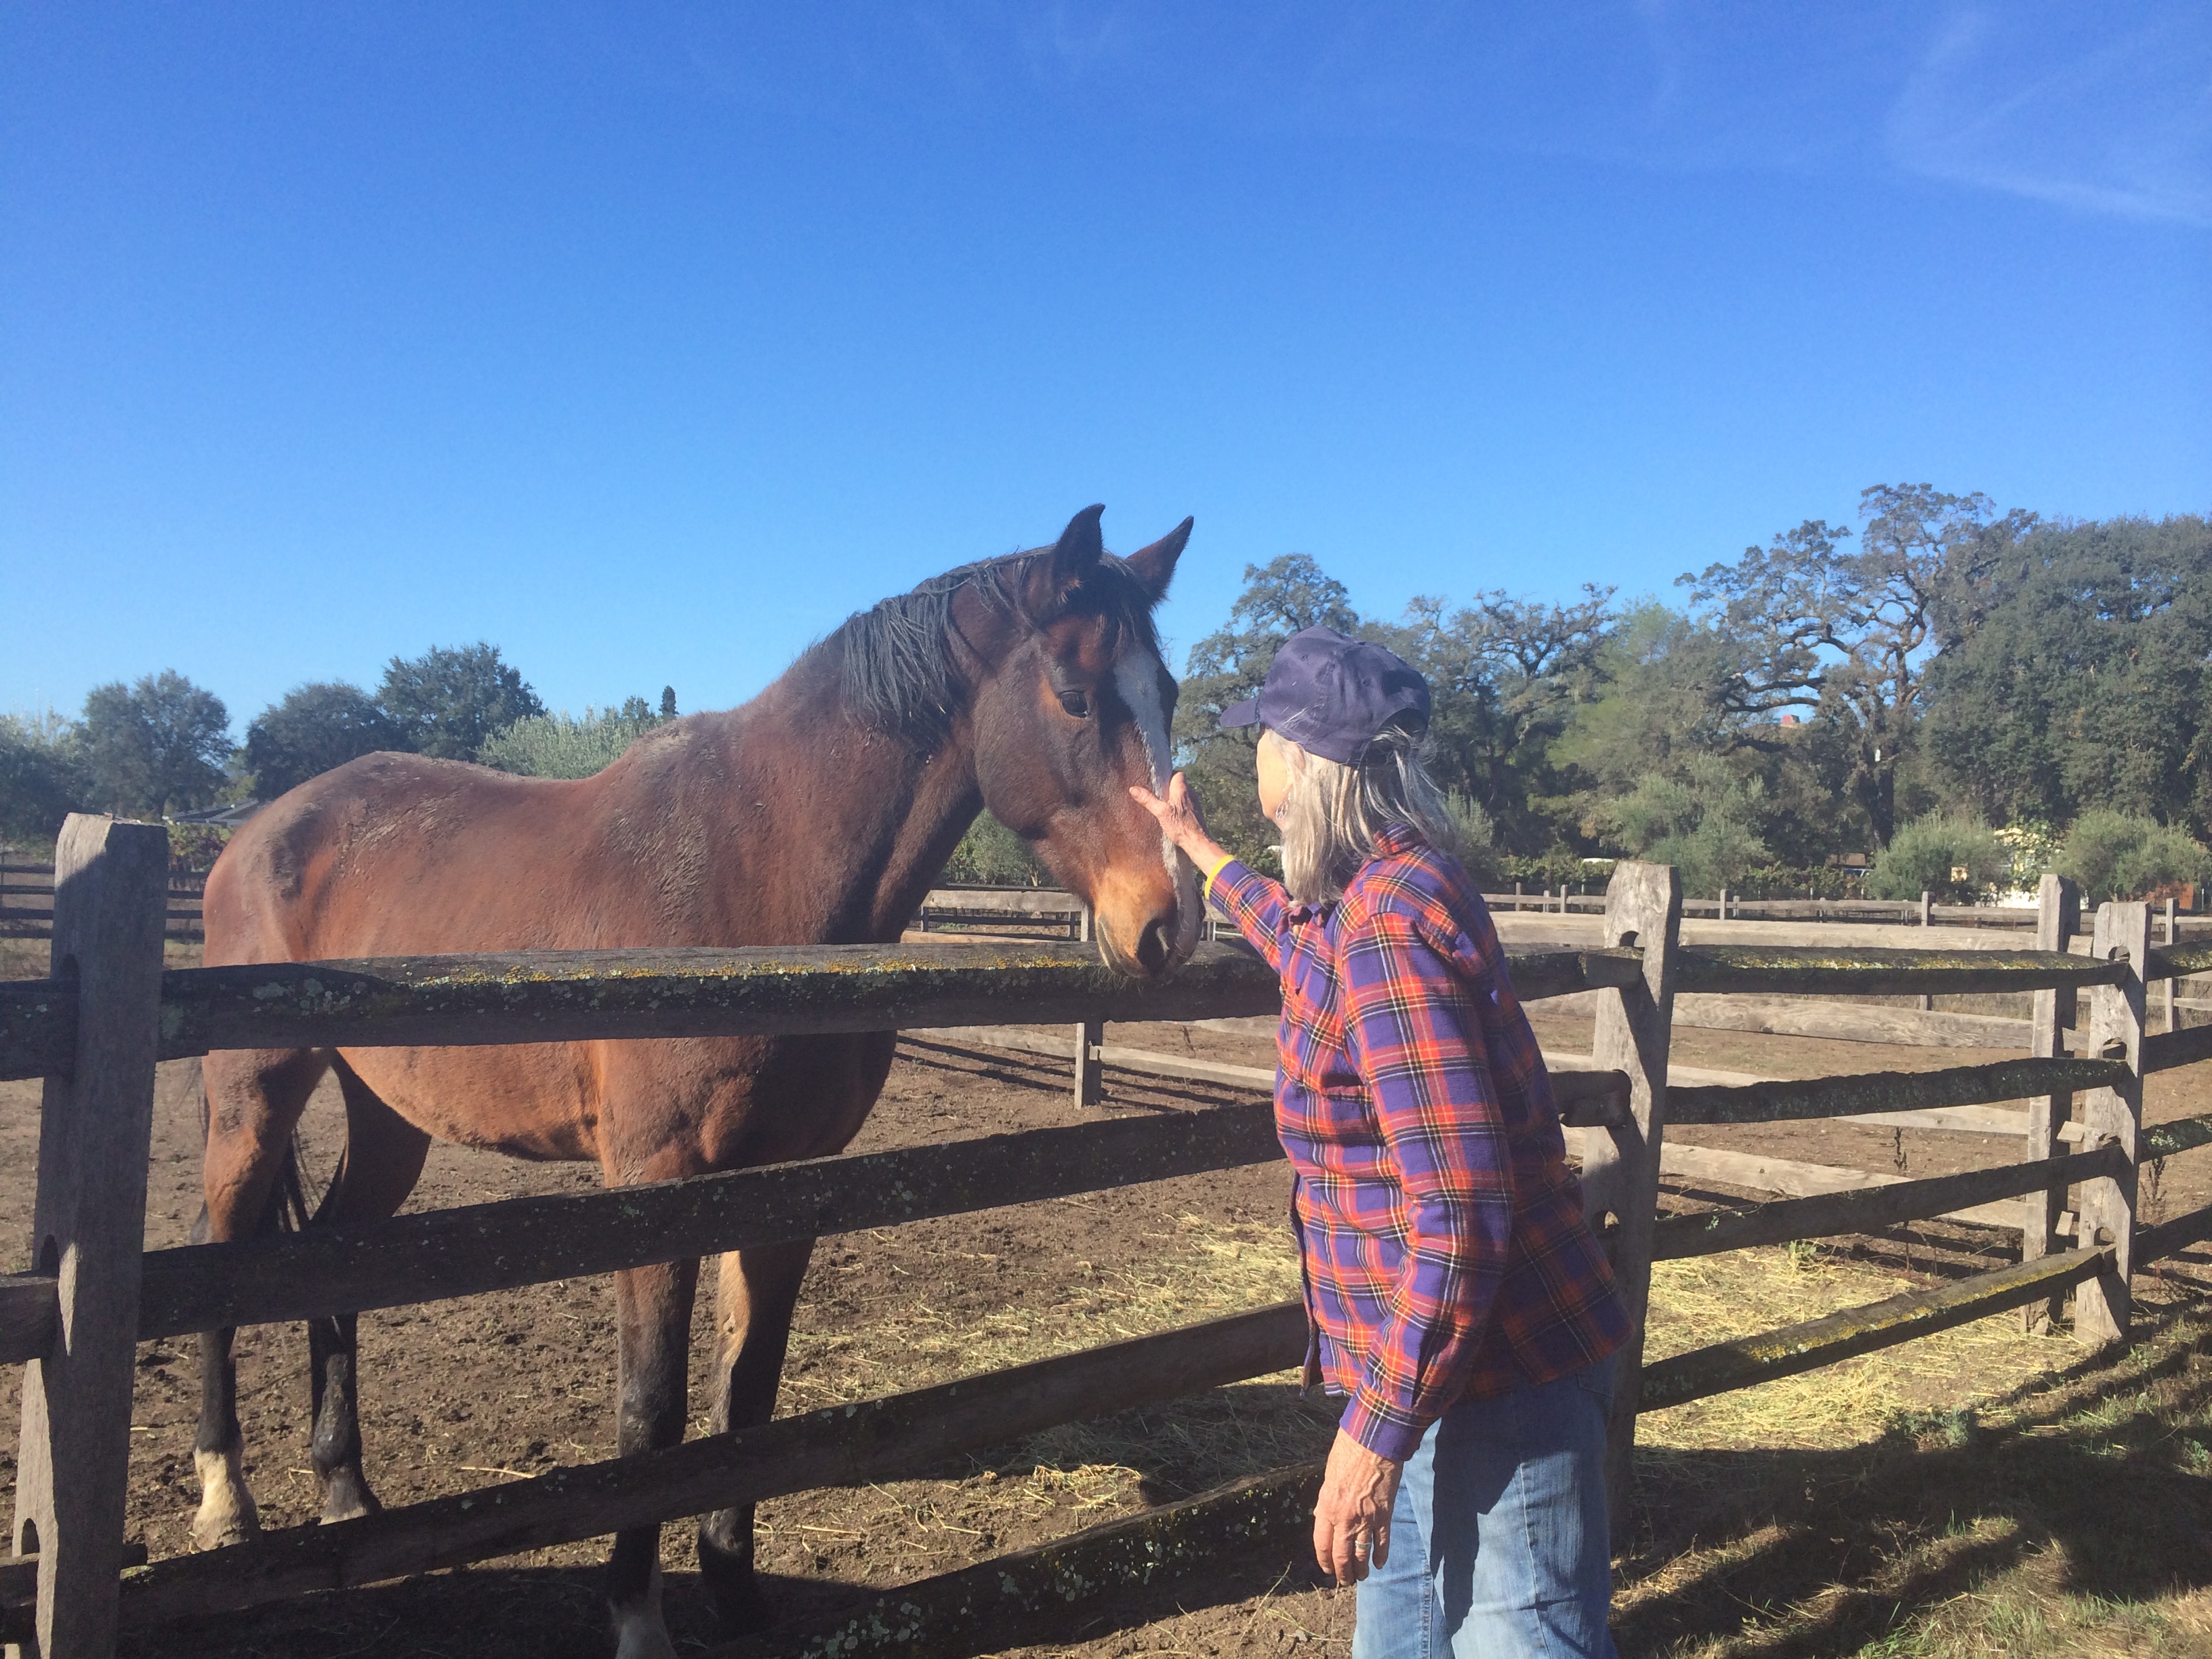
So about a month ago, I got myself invited to an olive picking party at a neighbor’s magnificent horse ranch, and our small crew of 14 spent most of a day picking 750 pounds of manzanilla olives for cold pressed olive oil. It was seriously fun, hard work. And guess how much olive oil that amount of olives will yield? …. only 13 gallons! I will never grumble about the price of good olive oil again.
Later that week I went back and hand-picked another 7 gallons of the green and medium ripe olives from the remaining trees. I looked for the greener olives for eating. I couldn’t wait to cure them!
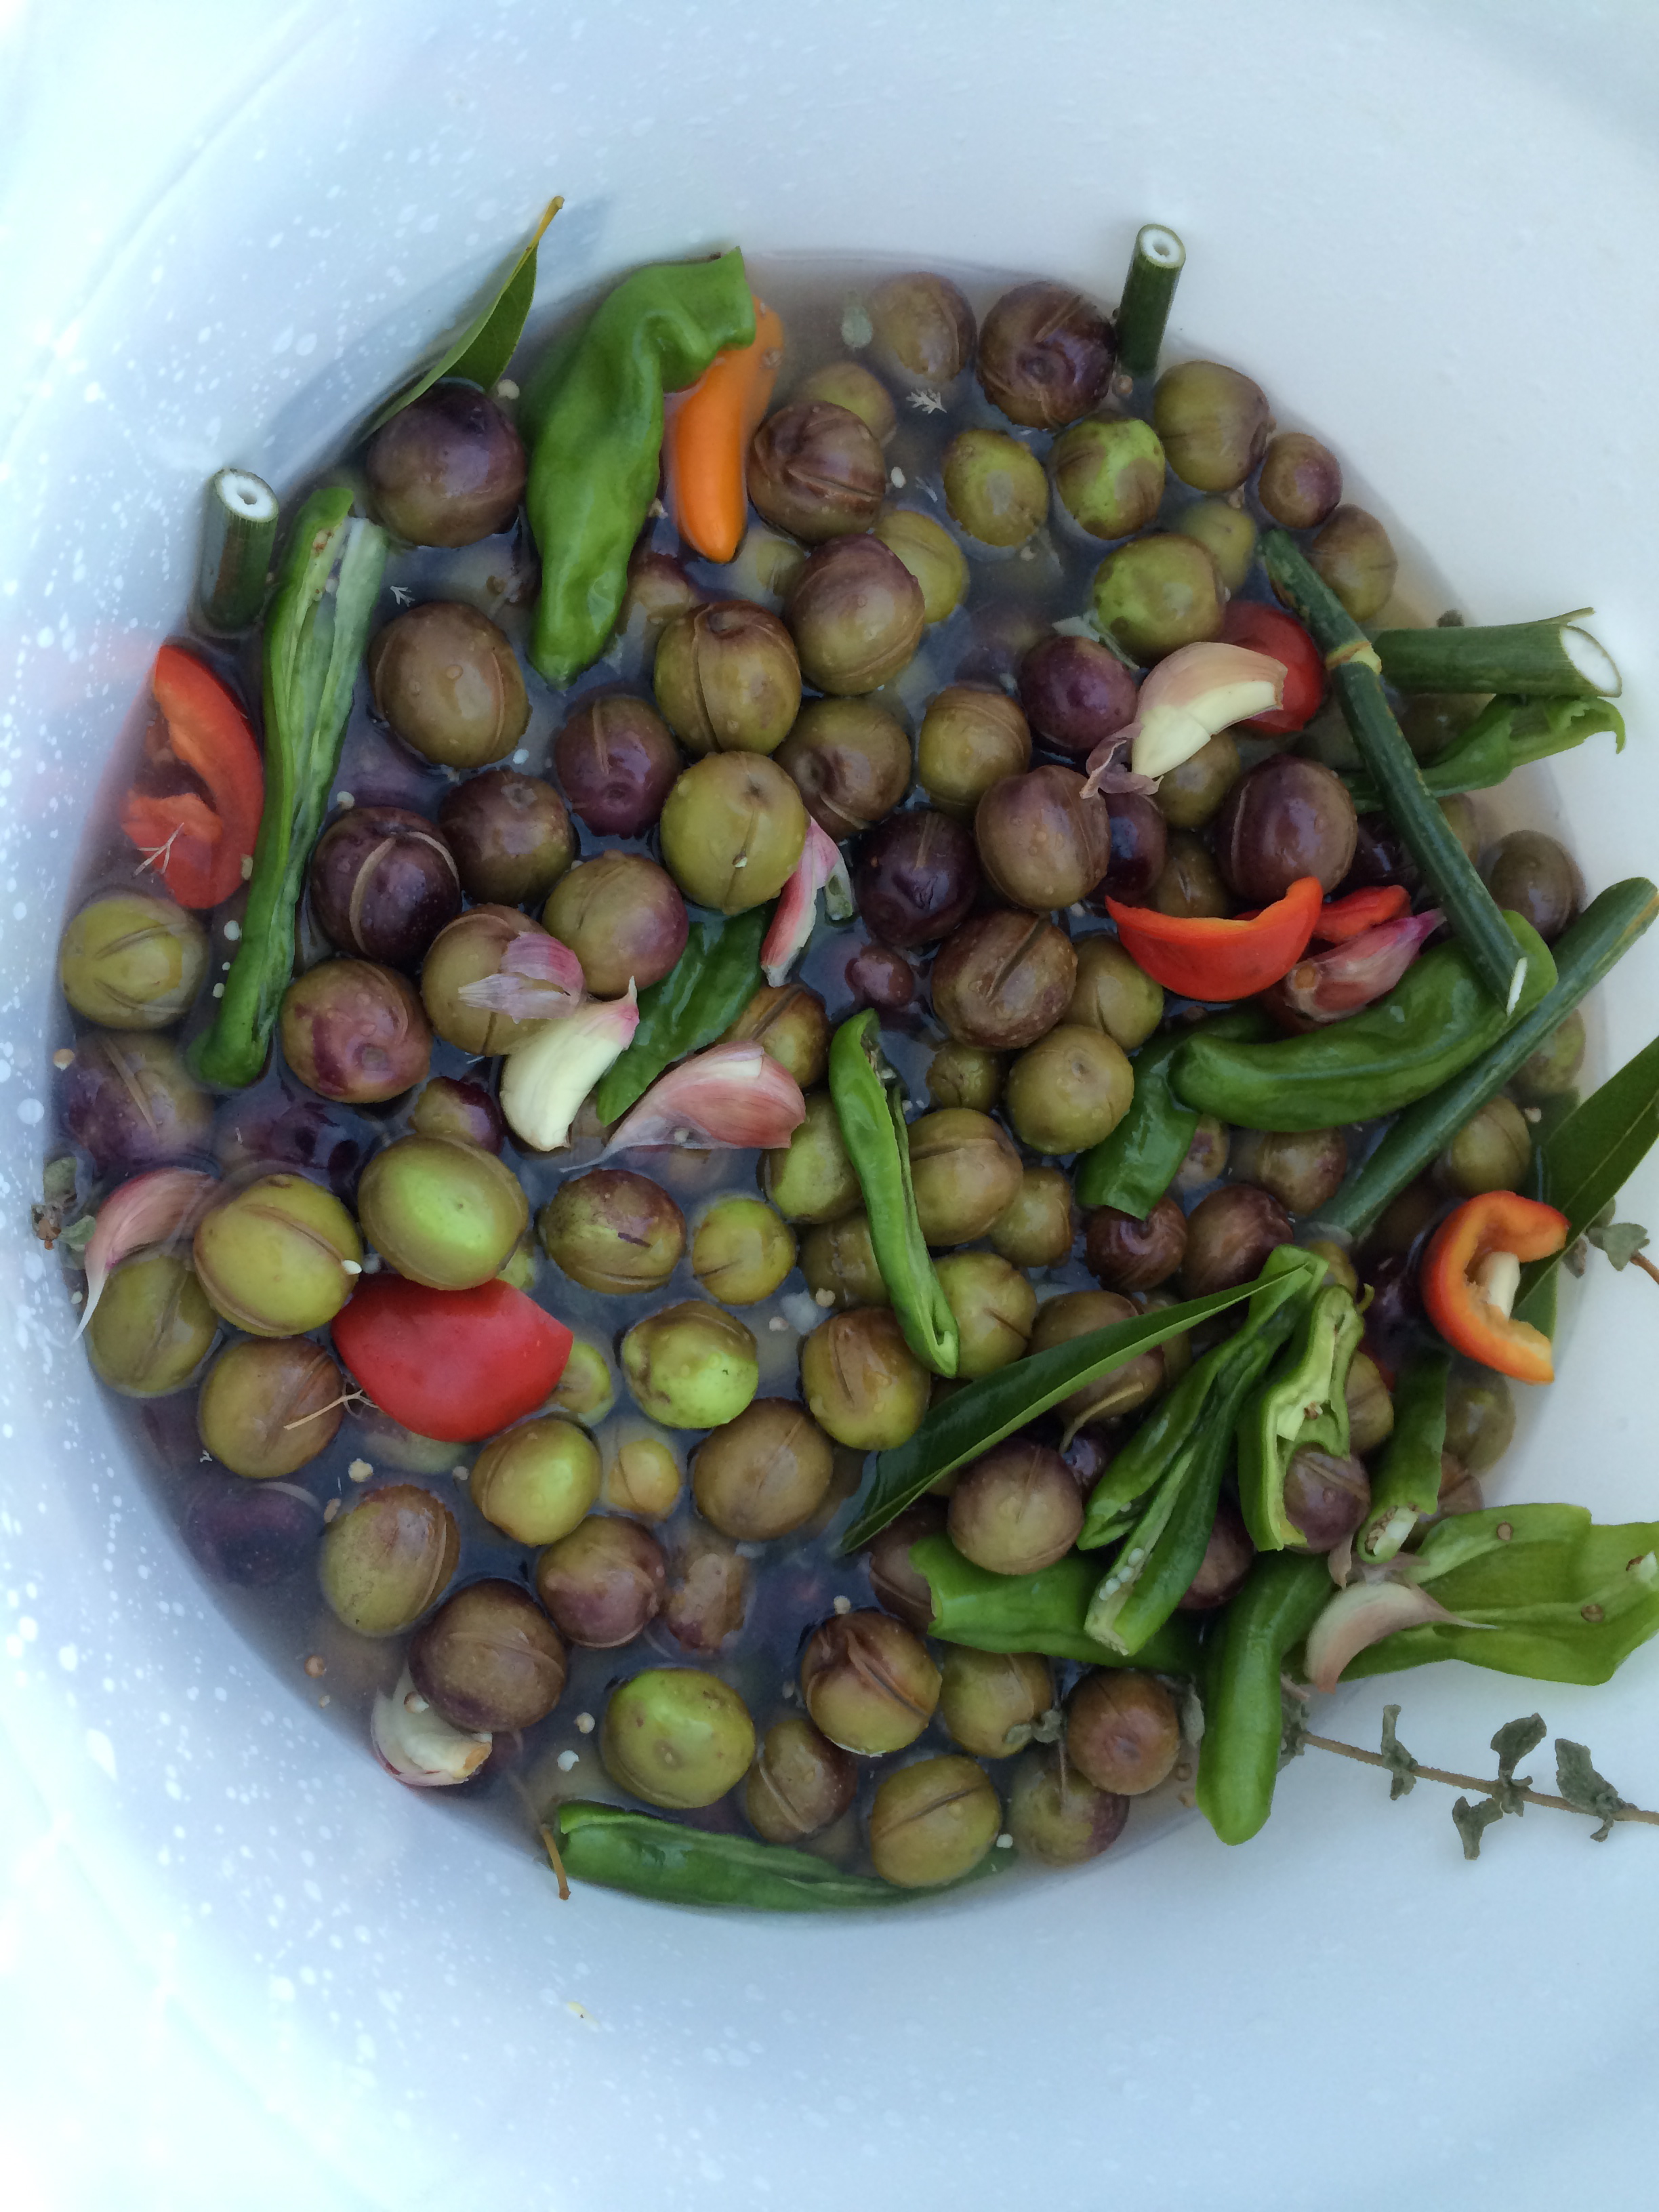
The olive curing process that I know is a water-cured process which I learned in Suryalila a few years ago from our neighbor there, Jose. What the Andalusians do is to crack or score each olive by hand, then soak for 7 to 10 days in water to remove the bitterness, and finally brine them in salt water infused with garlic, peppers and the herbs which grow wild in the area. I thought I would do the same, using locally grown and harvested Sonoma County ingredients, which included wild fennel foraged from the side of the road, California bay laurel leaves, marjoram and wild cilantro from my dad’s yard, and bright peppers and fresh garlic from the Cloverdale Farmer’s Market. Bounty of the County indeed!
Home Cured Olives – 7.5 Gallon Yield
- 7 gallons fresh green and medium ripe olives
- 3 gallons water
- 2# celtic grey sea salt
- 1/4 c whole peppercorns, lightly cracked
- 3 cups unpeeled garlic cloves
- 2# fresh red and green peppers, sliced
- 3 T whole coriander seeds
- 10 -15 fresh marjoram sprigs
- 10 – 20 fresh bay leaves
- 16 stalks fresh fennel, in 4-5″ pieces
- 36 oz white wine vinegar
- 750 ml olive oil (to pour over tops of olives)
Sort the Olives:

Sort olives, seperating the very greenest ones to be cracked, the medium to be scored with a knive, and the very ripest ones to be kept whole and salt cured.
- Cracked Green: With a mallet, gently crack each green olive on one side, just so it splits open. Try not to smash it too much here – you are are just looking to crack it open.
- Medium Ripe: With a sharp paring knive, score each medium-ripe olive in 3 or 4 places, so that the brine will penetrate down to the pit. Again, try to do without squashing or bruising the olives too much.
- Dark Black: The very dark, ripe olives I kept whole and covered in course salt and stored away in a cardboard box in a dark closet to “sun dry” them, ironically. This is a first time for me with this process so more later as I figure out what I am doing here…
Soak the Olives:
Using at least three 5 gallon buckets, cover the olives completely in cold filtered water and float a plate with a small weight on top to keep the top layer of olives submerged. Let soak in a cool dark place for a week to 10 days, draining and changing the water at least once a day. This helps to remove some of the bitterness of the olives, and the salt brining will complete the process. You will see that the cracked green olives, which have more surface area exposed, will de-bitter quickly, turning from bright green to a drab…well, “olive ” color. You should be able to almost eat one of these without grimmacing and 7 -10 days should do the trick.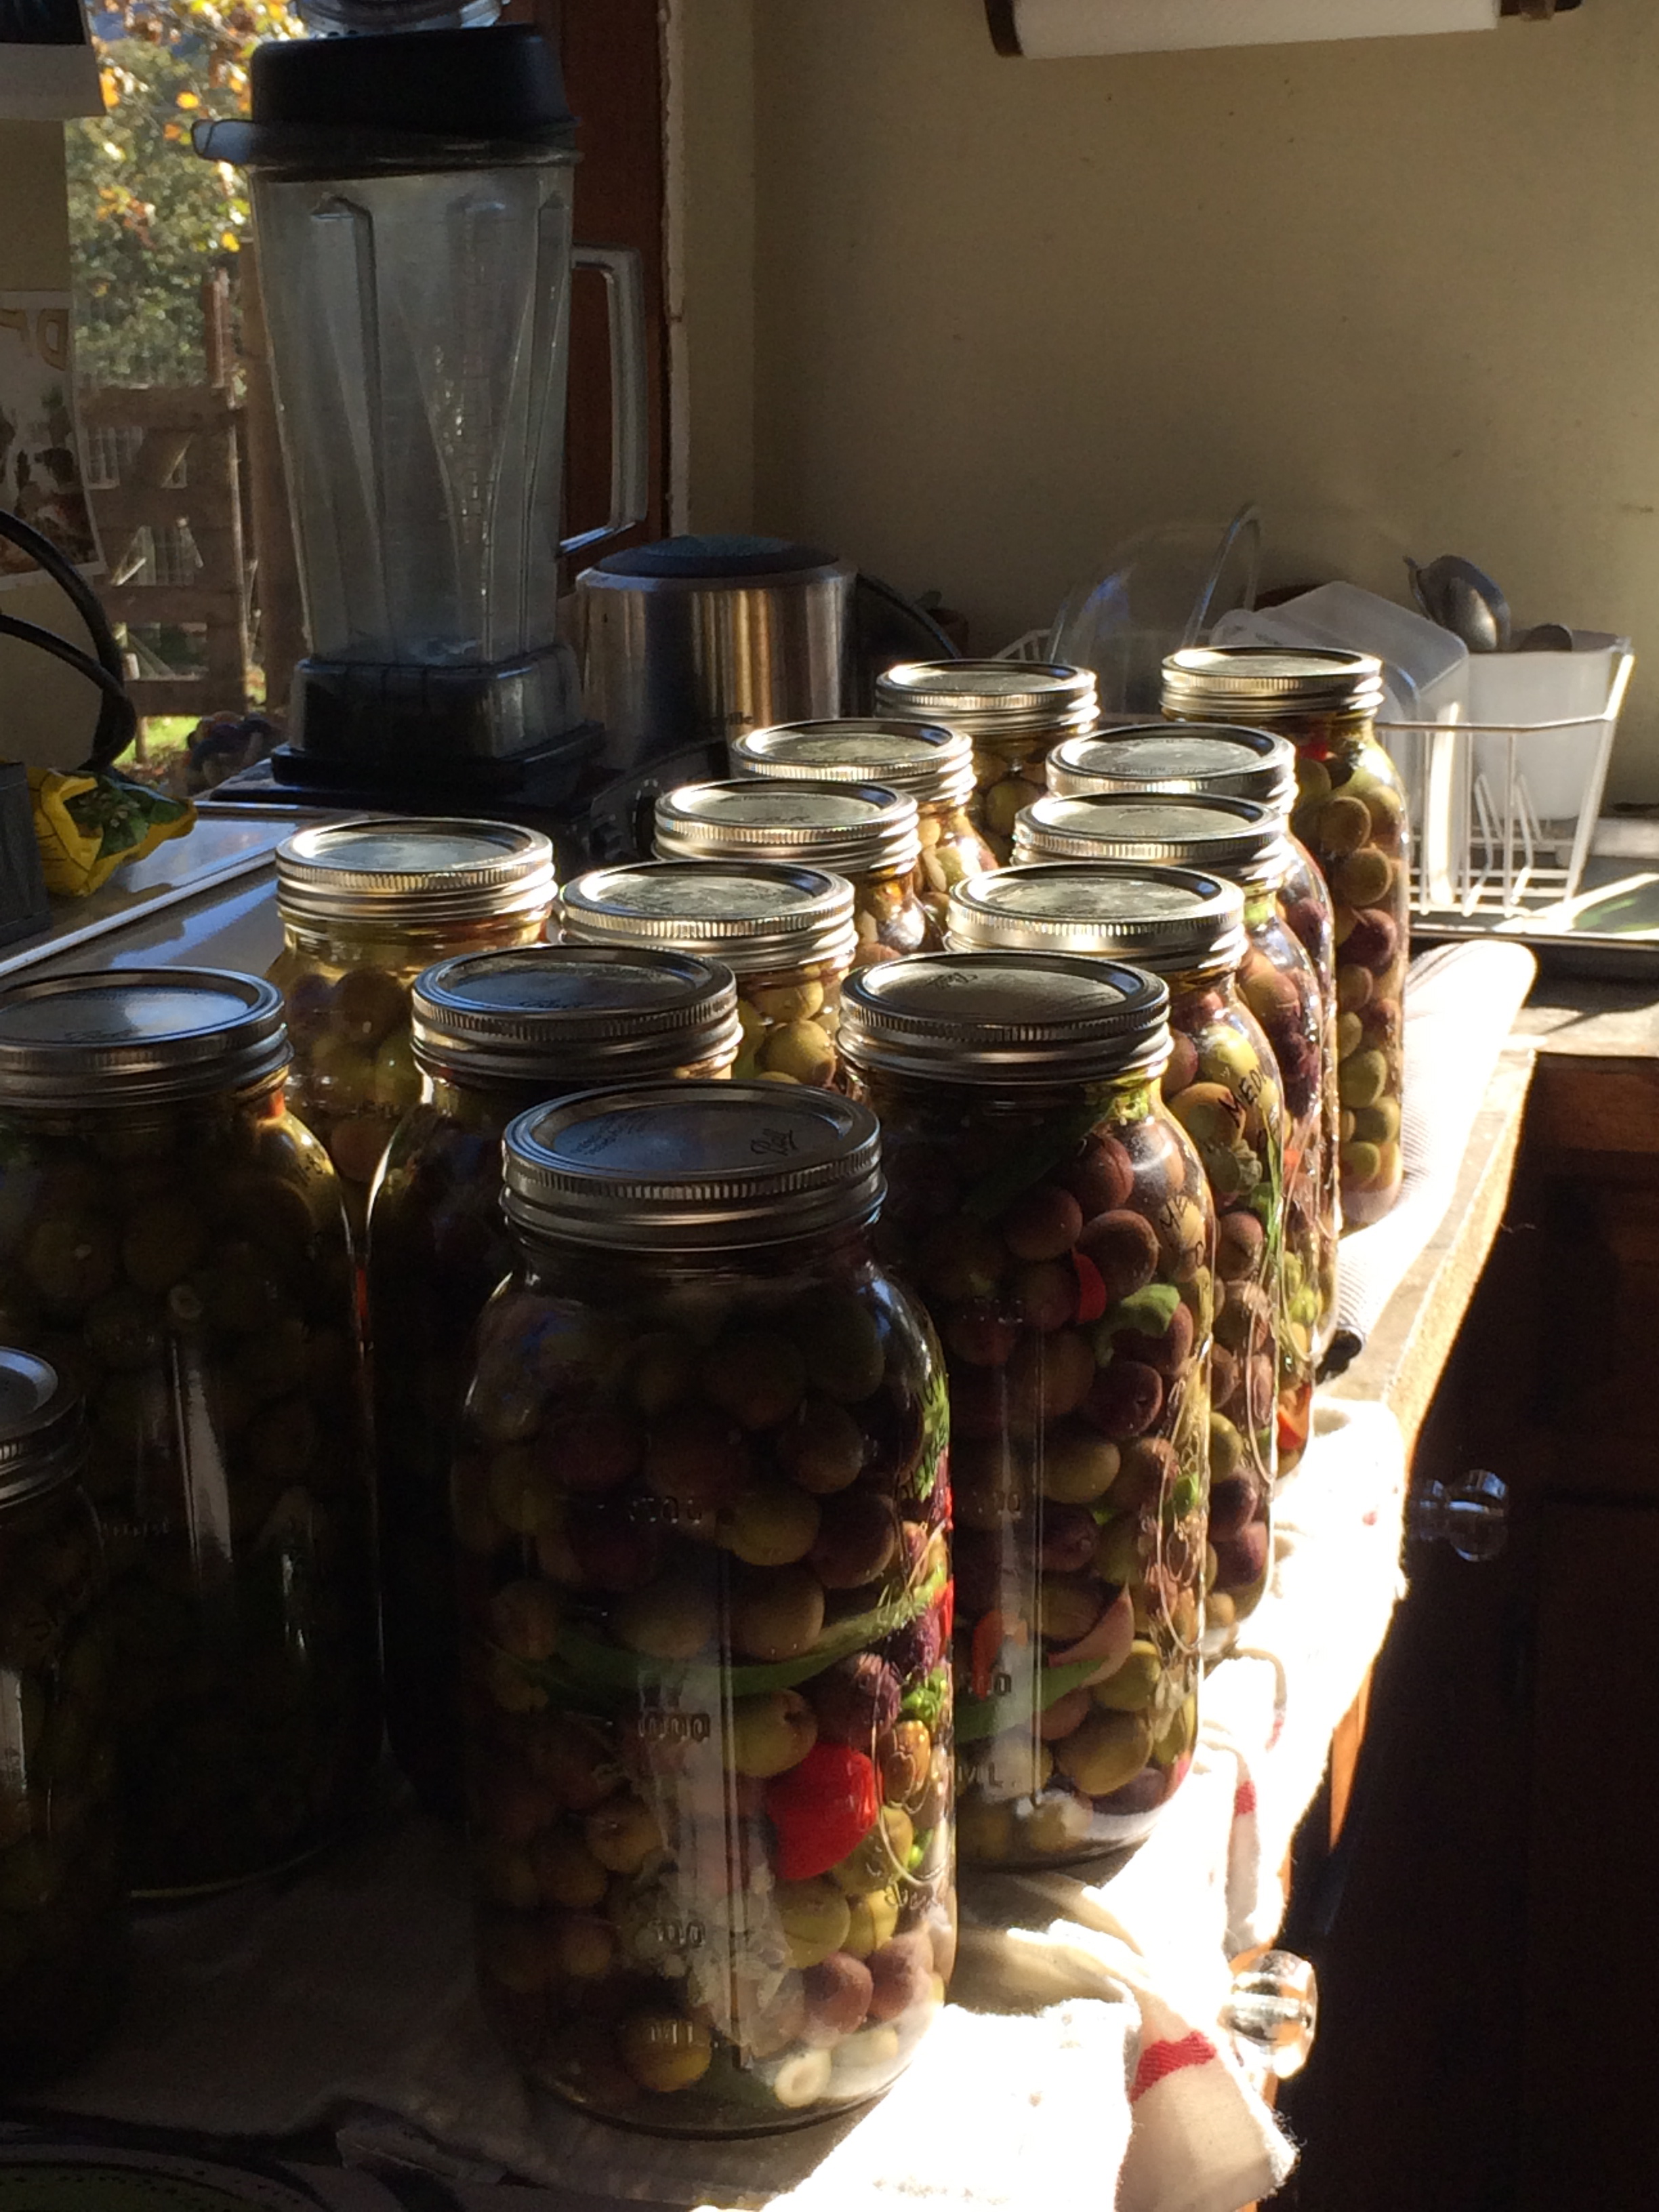
The less ripe end of the scored olives might take a few days longer – you will see them also change color. I pulled all of this batch after 7 days because of my own time restrictuions (I needed to get to NYC: Sometimes the slow food movement clashes with my jet-set lifestyle…) This will just mean a longer cure in the salt brine… it can take sometimse up to a couple of months for the bitterness to leave the olives this way.
If you soak the olives in water longer – 10 days to 2 weeks even – you can reduce the brine curing time (and the entire curing time) to only a few weeks. These olives will tend to be less bitter, but sometimes a bit softer than olives cured using the longer brining method.
Make the Brine:
A day before your olives are ready to escape their water bath, heat one gallon of water, add salt, and stir to disolve. Add remaining two gallons of cold filtered water. With your mallet, lighly crack the garlic cloves, and let sit out for at least 10 minutes to oxidize**, and then drop with peppers, herbs and spices into your bucket. In Spain, Jose lightly muddled the peppers with the garlic and herbs with a large mortar and pestle before adding to the salt brine, but I decided not to do this on this round. Too messy!
 Add 2/3 of the white vinegar and taste. I make half the olives at this dilution, and then add the remaining vinegar to the other half of the batch, making some of the olives a bit more vinegary. (Alternately, you can leave the vinegar out. Tradicionally the Andalucian olives are made only with salt).
Gently fill 15 half gallon mason jars with olives, nearly to the top. Pour brine evenly over olives, leaving 1/4 to 1/2 inch below the lip. Tap lightly on the counter to release bubbles, then top with olive oil to the rim. Carefully screw the jar lids on, leaving as little air in as possible.
Store olives in cool dark place, or (ideally) refrigerate. They are ready when they have lost their bitterness, and this can take from 3 weeks to 3 months, depending on the variety and ripeness of your olives, the length of your soak time, etc. You can try the cracked green olives in 3 weeks, but the scored olive will likely take a month or two to finish. To taste, fish out an olive or two, and then top off the jar with a splash more olive oil, keeping the olive submerged under the oil and as air-free as possible.
Buen Provencho!
* Using Celtic Grey Salt: I know… it’s crazy to spend $4 a pound on salt right? Wrong. Suck it up and spend the money on high quality, high mineral salt whenever you can. Using good salt to naturally preserve and cure olives is a no-brainer and makes them even more special… I consider them medicinal!
** Releasing Allicin: When crushed, raw garlic produces a powerful antibacterial, antifungal and antiviral sulphuric (stinky) compound called allicin. Within 5 minutes of being crushed and exposed to air, garlic explodes into a variety of sulfur-containing compounds which are supposed to be very good for the heart, lowering blood pressure and releasing more oxygen to the blood stream (always a good thing!). Studies have also shown that raw garlic a powerful anticarcinogenic, internally halting the growth of cancerous tumours in the body.
***What’s in an Olive?
Raw cured olives are chock full of healthy, monounsaturated fat and loaded with antioxidant and anti-inflammatory nutrients. Green olives are higher in oleic acid, which has been shown to decrease blood pressure, while black olives contain more iron and vitamin E. Both also contain serotonin, the hormone which triggers your body to feel satisfied… how good is that? Eat your olives!
Purple Avocados and Honey, Hawaii-style

photo credit: Kevin Smith
Nostalgia Alert: When I was a kid, I lived with my mom in Northern California during the school year and spent the holidays and summers with my dad. It was a good deal, especially since my dad worked as an art professor for the University of Hawaii, so many of my holidays and summers were spent on the islands of Oahu and Kauai. On Kauai, there is an amazing valley on the Northwest side, in the Na Pali Coast called Kalalau, which at the time you could only get to via an 11 mile hike or by inflatable Zodiac boat. (I think now even those are not allowed). Also it was a state park, so visitors are only given licenses to stay for a few days at a time. Luckily for us, we were good friends with both the rangers and “Captain Zodiac”, the owner of the island’s one boat company, so we were able to boat in and live at the ranger’s camp for weeks at a time. Kalalau Valley is mythically beautiful, and you can easily get lost for hours or days at a time climbing up into the sheer Na Pali cliffs. My childhood memories include sand so soft and fluffy you sink to your knees in it, a wonderful crazy lady named Bobo who lived deep in the valley, wore no clothes, and had the most impressively scarred body I have ever seen, as well as long afternoon hikes through the sun-dappled valley, searching for elusive wild orange groves and wild avocado trees.
 Wild Hawaiian avocados are small, stringy, and bright purple, and the locals eat them as a fruit, with honey. I can’t tell you how delightful an avocado can be when you go beyond the guacamole typecasting and consider it as the fruit that it really is! Also in Hawaii you can get tubs of naturally crystallized honey which has a thick beeswax foam on the top. It tastes much less sweet than liquid honey and can be spread like butter on bread. The closest I can find in the states is something called Really Raw honey and it is delicious. Here is my favorite breakfast…
Avocado on Toast, with Creamed Honey – for 2
- 4 small slices high quality whole grain bread (walnut is awesome)
- 2 – 4 teaspoons high quality raw honey, local if you can get it
- 1 perfectly ripe avocado
- pinch of Himalayan, Celtic grey or other high mineral natural salt
 Toast the bread slices and spread each with 1 – 2 teaspoons of honey. I like it light.
Cut avocados in half, remove seed, score the flesh and scoop out 1/4 avocado per toast slice. Spread evenly and give a wee sprinkle of salt.
Enjoy!
“Chinese Chicken” Salad
This is an old recipe of mine, which I used to do a lot and then forgot about until recently. It’s a bit labor intensive, and slightly evil (if deep-fried tofu qualifies) but it’s a serious crowd-pleaser and gets people into eating heaps of salad so I think it’s worth it.
Vegetarian “Chinese Chicken” Salad for 8
- 2 # tofu
- 1 -2 cups peanut oil (for deep-frying)
- 2 cup water
- 2 tablespoon soy sauce
- 3 tablespoons maple syrup
- 1 tablespoon nutritional yeast
- pinch of red chili flakes
- 1/4 t. white pepper
Dressing
- ½ cup rice vinegar
- 2 tablespoons maple syrup
- 1 tablespoon sesame oil
- high quality salt
- white pepper
Salad
- 2 romaine heads, cut into 1″ strips
- 2 cucumber, sliced thin
- 1/2 green apple, sliced paper-thin
- 1/2 red pepper, in thin strips
- 2/3 cups toasted almonds
- 2/3 packs rice or bean thread noodles (optional)
- 2/3 cups thinly onions or shallots (optional)
Make the tofu “chicken” by cutting tofu into thin strips – roughly 1 x 3 inches in diameter and about 1/4 inch thick. Deep fry in small batches in hot peanut oil, draining well on fresh paper towels as you go. As you fry, combine water, soy sauce, maple syrup, yeast, chili and white pepper in a large deep skillet or braising pan, bring to a boil. As you fry, add well-drained batches of fried tofu to the simmering liquid, mixing in as you add each new batch. Continue to boil the tofu in sauce, stirring occasionally, until all the liquid in the pan is absorbed and the tofu just begins to caramelize on the bottom of the pan. Watch it carefully here and pull off just before it browns or starts to burn. There should be a nice slightly thickened glaze coating all the tofu, and some tofu pieces will be a bit crunchier than others – that’s all good. Transfer to a sheet pan or baking sheet and cool completely.
Once the tofu is out, deep fry handfuls of dry rice or bean threads very quickly in the hot oil just until they puff up. Drain on towels. Fry onions or shallots if using.
Whisk together all dressing ingredients to combine. Set aside.

 When ready to assemble, combine all salad ingredients in a large bowl, topping with cooled tofu and fried noodles, and toss lightly with some of the salad dressing. Serve immediately while the noodles are still crisp, passing the remaining dressing at the table.
For a great almost-Fall meal, I serve this with sesame or scallion buns, and a hot (or chilled, depending on how almost it is) ginger carrot soup…
Gazpacho Andaluz!
 Hola from España! I am back at Suryalila and midway through cooking for about 45 people on another Yoga Teacher’s Training with Vidya. Everyone here is studying very hard right now and I am again in the Suryalila kitchen, where our team has happily hit cruising altitude and is flying smoothly through meal after beautiful meal.
What could be more appropriate for September Equinox in Southern Spain than Gazpacho Andaluz? Here is my favorite recipe – when I made it the first time I was here I was shy about how truly “Andalusian” it was, (especially with my obvious deviations, like fresh ginger!) but since then I have gotten the big thumbs-up from our local friend Manuel and many of our neighbors, so I now can proudly say it’s been officially sanctioned. The hard-boiled egg topping, “huevo duro”, was the only suggestion from Manuel – and it’s a great one – so I have added as an optional third condiment.
Gazpacho Andaluz – for 10
- 4 cups fresh sweet tomatoes, roughly chopped
- 2 cups cucumbers, peeled (seeds ok), in pieces
- 1 cup sweet red bell peppers, roughly chopped
- 1 clove garlic, minced
- 1/4 small red onion, cut small
- 1 T fresh ginger, cut small
- 1 cup extra virgin olive oil

- 1 1/2 t. balsamic vinegar
- 1/2 t. freshly ground pepper, or to taste
- 1 T high quality sea or Himalayan salt
- 2 T honey or coconut sugar, or to taste
- 3/4 cup sun-dried tomatoes, soaked in 2 cups water

Mix together all ingredients in a large bowl, then blend in batches in a Vitamix until completely silky smooth, adding tomato soak water if necessary to blend, or a little ice as necessary to keep cool. Adjust for salt and sweet, and chill well before serving.
Serve well chilled in a big bowl, along with small bowls of toppings…
- Homemade Garlic Croutons (or leave out, for gluten-free)
- Mixed Veggie Topping
- Huevo Duro (or leave out, for vegan version)
Homemade Garlic Croutons
Please do not use prefab croutons here! Once you try these you will never go back.
- 8 slices of whole grain bread, torn or cut into bite-sized pieces
- 1/4 cup high quality olive oil
- 1/2 t salt
- 1/2 t freshly ground pepper
- 1 T crushed garlic
Mix garlic, salt and pepper into olive oil in a large bowl, combining well. Add bread all at once and toss vigorously to coat all the bread as evenly as possible. Taste and adjust, adding more oil and salt if necessary. It should be delicious already. Toast slowly in a dry stainless or cast iron frying pan, stirring occasionally until browned and crunchy on all sides (my favorite method, since they stay a little soft in the middle) or toast in a 325° oven until crisp through.
Mixed Veggie Topping
- 1 large red or yellow bell pepper, diced
- 1 cucumber, peeled and diced
- 1/2 green bell pepper, diced
- 1/2 small red onion, diced
Combine together and toss with a little olive oil and salt just before serving.
Huevo Duro (optional)
8 high quality eggs, hard-boiled for 10 minutes and diced.
A Note on Eggs…
Please make sure your eggs come from happy, pastured hens, or forget about using them. Seriously, this soup is fantastic without the huevo duro, and the only reason I am including it is this is how they do it here in Andalusia. Everyone who lives here seems to have chickens pecking around in their back yards, and happy, sun-drenched hens make for very good eggs. So please just skip the eggs if you can’t vouch for the happy hens.


Gnocchi gnocchi gnocchi gnocchi gnocchi….
 Besides being really fun to say, and sort of mind-boggling to spell, gnocchi are really super fun to make. And, apparently, you can make them with pretty much anything. This winter, after years of being intimidated by the process but drawn to the allure of these puffy little dumplings, I finally decided to tackle them and pulled out my mom’s old fashioned potato mill from the pantry….
I started with what looked most legitimate – the über fussy potato ones from Nancy Silverton’s gorgeous new Mozza Cookbook. Because I am incapable of following a recipe verbatim, (even my own), and because I wanted to try making them using white whole wheat flour instead of white all-purpose, I second-guessed the recipe and added about 1/2 cup less flour than she calls for.
They were incredibly delicious – maybe one of the the most delicious potato things I have ever put in my mouth. But they were also almost too delicate, and could have used more flour in them for a bit more bite…(probably exactly what the recipe called for). Making potato gnocchi is really a project and the Mozza recipes are great – very detailed and wonderfully specific – so rather than trying to re-post my only slightly modified version of that recipe*, I am going to recommend that you get that book, which is loaded with other inspiring veggie recipes, and devote an entire Saturday afternoon to the Potato Gnocchi Gods as I did. It’s wonderfully satisfying.
On the other end of the spectrum – for everyday life – there is ricotta gnocchi, which are so ridiculously quick and non-fussy to make that a dinner for two can be pulled together in about 30 minutes. Probably less. These are really a different creature than the potato ones, even if they look the same. Whipping these off the fork last night with the help of a somewhat ambivalent 12 year old was a whole different dimension from the Saturday mega-project, which was a dedication to art and love. The ricotta dough is definitely less silky and refined, and these gnocchi of course will not give you the Sublime Potato Experience (if you are prone to that sort of thing). Nonetheless, they are possibly even more fun to make because they can be made so easily and spontaneously, and they are unpretentious enough to really be dressed up with any funky old sauce, or none at all. They are amazingly tasty just as they are.
 Fresh Ricotta Gnocchi in Herbs – for 4
- 2 cups whole milk ricotta, (organic, grass fed if possible)
- 2 whole eggs
- 1 cup freshly grated Parmesan (use a microplane)
- 1/4 t salt
- 1/4 t white pepper
- freshly grated nutmeg
- 1 1/4 cup white whole wheat flour, plus 1/2 cup for shaping
- 3 T. butter, olive oil, or a mix
- 1 T minced fresh herbs (rosemary, sage, thyme, or a combo)
- 1 T freshly chopped Italian parsley
In a medium sized bowl, combine ricotta, eggs, 1 cup Parmesan cheese, nutmeg salt and pepper. Still to combine thoroughly. Add flour and mix lightly to combine. Dough will be very soft.
Dump out onto well floured board, turn over and fold over very gently a few times just to fully integrate dough. Separate into two balls and, taking turns, shape and flatten each one into a 1 inch thick rectangle. Using a clean knife, cut 1 inch strips from this and gently, on a well floured board, roll each one out into a 1/2 inch thick rope of dough.
Cut the rope into 1 inch “pillows” and, using your thumb on the back of a fork, gently roll each gnocchi off the fork tines, creating ridges on one side and a bit of an indentation on your thumb side. Don’t be afraid to be liberal with the flour. Or, you can just forget the fancy fork thing and do some rustic “loggy” ones or whatever you like. Try some fishes! Just make batches in relatively all the same size so that they will cook at the same time.
Repeat shaping the remaining gnocchi, dropping the finished ones on a floured baking sheet in a single layer. These can be frozen like this, to be bagged up after they freeze or cooked immediately.
 In a well seasoned or non-stick skillet, heat butter, olive oil and minced herbs gently while you cook the gnocchi. Keep on low-med heat so the herbs get a little crunchy, but do not burn.
To cook, bring a medium sized pan of salted water to a boil. (The rule for fantastic pasta of any kind is to make the water as salty as the ocean, and to use high quality grey, sea, or Himalayan salt to do this with. Trust me, it’s worth it). Cook the gnocchi in 2 – 4 batches at a time, for only about 2 – 3 minutes after they float to the surface. Alternately, you can skip the cooking and try just pan frying them, but I found them a bit lighter if you boil them first.
Drain with a slotted spoon or strainer, adding all the cooked gnocchi to your skillet before tossing quickly and giving a slight reheat in the herb-butter. Finish with a touch of coarse salt, freshly ground black pepper, and parsley, and top each serving with a bit of grated Parmesan.
*The white whole wheat flour works surprisingly well in gnocchi! Substitute 1:1 for all purpose in the recipes. It’s delicate and just slightly nutty which works great with the butter sauce, and you know…if you didn’t know, you wouldn’t know.
Baked Samosas with Fresh Cilantro Coconut Chutney
 I have a real soft spot for India. It is a magical place. When I was 18 years old, I traveled around India for 4 months, completely falling in love with the country. It is incredibly intense, beautiful, rich, magical and maddening all at the same time, all of the time. I felt completely at home there! And also knew from the first day that this would be a place I would keep returning to for the rest of my life. So far I have been back 4 times and after this week, it might be time to start thinking about it again. I have heard it has changed a lot, but during the 80’s and early 90’s India was pretty much completely vegetarian, even in the in the very Northern, Punjabi region. It was amazing to travel in a a country that was so vegetable oriented, especially at a time where it was not so easy to be vegetarian anywhere else.
Despite my love affair with the country and the food, I find myself rarely cooking India food now because so much of it is so… well, cooked. In a country with very little refrigeration, fresh raw vegetables are not the primary focus, (and in fact can be deadly). The flip side is the wonderful complexity of the spices, which are not only delicious, but are often anti-microbial, immune system boosting, and anti-inflammatory. But, what about FRESH?
Last week I was looking for a recipe for Sarsan Ka Saag, (Punjabi Mustard Greens) and discovered a delightfully passionate Indian chef, Sanjay Thumma, who is fantastic becuase he is so exuberant about making delicious but also healthy and fresh Indian food. If you like Indian, make sure to check him out. He is endlessly entertaining, and I spent hours on Youtube this weekend watching the Vah Chef and then playing with “freshing up” his traditional Indian recipes even more.
This recipe is adapted from Sanjay Thumma’s Samosa video. Please watch it for the samosa wrapping technique.
Samosa Dough (makes 12)
- 1 cup unbleached white flour
- 1/2 cup whole wheat flour
- 3/4 t salt
- 1/4 t ajwain (I left out, but would have added in if I had it!)
- 2 T oil
- 1 T lemon juice
- 6 – 7 T water
Make the samosa dough: Mix flours, salt and spices in a bowl and add oil, mix well using hands to thoroughly incorporate the fat into the flours. Sprinkle with lemon juice, and 6 T water and toss lightly just to combine. Add more water if necessary for dough to hold together in a stiff ball but do not overwork. Flatten slightly and chill for 30 minutes or more, while you prepare filling.
Samosa Filling:
- 4 cups cooked potatoes, cut into 1/2″ cubes
- 2 T organic grapeseed oil
- 1 t whole cumin seeds
- 1/4 c chopped cashews
- 1 t turmeric powder
- 1 whole hot green chili, finely chopped (to taste)
- 1 T whole coriander seeds, soaked in warm water at least 5 minutes
- 1 T crushed fresh garlic
- 1 T crushed fresh ginger
- 1/2 t salt
- 1 t ground cumin
- 1 t ground coriander
- 1 t cayenne pepper
- 1 cup fresh or frozen green peas
- 1/2 t garam masala
- 1/8 t asafoetita
- salt to taste
- 1 cup fresh chopped cilantro
- 1 t. lemon or lime juice
In heavy bottomed or cast iron frying pan, fry cumin seeds and cashews in hot oil for 30 seconds or so on medium heat. Add soaked coriander seeds, turmeric and hot green chili. Saute one minute and add ginger and garlic paste and salt. Cook for 1 – 2 minutes. Add coriander powder, cumin powder, cayenne and green peas, saute 1 -2 minutes to coat. Add cubed cooked potatoes, garam masala, asafoetita and probably about 1 t. more of salt. Combine well and heat through, adding a splash of water if necessary and adjusting for heat and spice (Go ahead and make it a bit spicier than you think you should – it mysteriously mellows out when wrapped in a samosa). Turn off heat and add cilantro and lemon juice. Adjust the spiciness and salt to taste and set aside to cool slightly.
Make the Samosas: Preheat oven to 400°. Lightly oil a heavy sheet-pan.
Cut the dough into 6 small balls and roll out each into a very thin oval (about 7′”x 5″ ideally). Use a well floured board to prevent sticking, and don’t be afraid of making the dough very thin or having ugly edges. Cut each oval down the middle on the short side, to create two half-rounds. Moisten around each side with a bit of water and pinch the straight edge together, forming a cone. See the Vah Chef video, to watch how to wrap these exactly.
Fill each cone with samosa filling and seal edges as shown. Place bottom side down on sheet-pan and bake for 20 – 30 minutes until bottoms are well browned and tops become lightly golden.
Serve hot with lots of Fresh Cilantro Coconut Chutney! Yumm!


Fresh Cilantro-Coconut Chutney
 Fresh cilantro is a blood purifier and excellent chelator, known for removing heavy metals from your body such as mercury, lead and aluminum. Like many herbs, it is also high in minerals, particularly potassium, calcium, manganese, iron, and magnesium. It is also very high in antioxidants (cancer fighting) and and one of the highest natural sources for vitamin K (good for bones). This recipe is super easy to make and so delicious that I sometimes eat it out of the bowl with a spoon after I run out of things to spread it on… try it with the Baked Samosas for sure.
- 1 whole bunch fresh cilantro, cleaned and chopped (stems ok)
- 1 cucumber, unpeeled, cut into large chunks
- 1 whole lime, juiced (or whole, just peel lightly and add in chunks)
- 1/2 cup grated unsweetened coconut
- 4 fresh jalapeno peppers, cut into chunks
- 1 t salt
Blend all ingredients in a Vitamix or high speed blender, adding in cilantro and coconut last. Adjust the spice and salt to taste.
Make it your own – there are infinite variations!
- Mix a 1/4 cup fresh mint leaves in with cilantro
- Replace cucumber with fresh green bell pepper
- Add hot Indian chili peppers instead of jalapenos for more heat, or leave out chilies completely
- Add a bit of ginger, garlic or both
NYC Mooo-sings: Local Farms and Dairy…
So, ok, I have to admit I might be reverting back to my hippy roots, right in the middle of NYC. It might be the only way to survive this city. How do you know you are turning into a hippy? Three things:

A weekly haul from Bed-Stuy Farm Share
1 ) I have “farm share envy”. I did not sign up for a CSA this year, since we were planning to spend the summer in CA which would be peak season, and I am sorely missing it! I am so jealous of my friend Mimi who lives in Brooklyn and is pulling in the best CSA haul I have every seen at Bed-Stuy Farm Share. Check it out. But not having a CSA has caused me to do some research on how to get local seasonal fresh veggies in the NYC area without committing to the whole season, and its cool, because I found a lot of new local delivery programs cropping up.
2 ) I like poop and feathers on my eggs. I really never thought I would say that, but its true. There is something totally satisfying about opening up a egg carton and seeing a dozen gorgeous eggs, slightly dirty, with the occasional feather stuck on, which I know were laid by truly happy range roaming chickens, who ran around in the sun, ate bugs, and did all those disgusting things that chickens are supposed to do.
3 ) I am going subversive with my milk. That’s right, we are talking unannounced deliveries, sometimes late at night, paid in cash, quick transaction. Yes, for… raw milk. The really super dramatic substance that caused police to raid an organic market in California last year with guns drawn… (thank god we have the government to protect us from ourselves). This is not just raw milk, either, its 4.6 percent organic raw milk from happily pastured cows… and it serves the glorious purpose of making me thoroughly enjoy my morning coffee without a twinge of guilt. I do believe that dairy should be used sparingly (no more than 5% of your dietary protein should come from animal sources and that a mostly vegan diet is best overall*) but, you know…a little really high quality butter, milk and eggs is good for the soul. And ONLY if it comes from happy animals. In the end, I am finding that in the maze of supermarket decision-making, knowing where my food comes from has started to hit the top of the list.

Green Aracuna Eggs!

Raw Sheep Milk Feta
If you are in the New York City area, here are some great resources for local farm fresh deliveries:
Udder Milk Creamery Co-op: Free to join – weekly deliveries of fresh organic, pasture-happy dairy and eggs.
Basis Good Food to You: for local farm share produce on a no-commitment weekly basis. Not quite as great as a real CSA box, but good if you can’t make the seasonal commitment and want seasonal local fruit and veggies.
And to find a CSA in your area, or organic farmers’ markets, festivals, family farms, and other sources of sustainably grown food anywhere in the US, make sure to check out Local Harvest. It’s a great resource site for locavore living wherever you are.
* For more about the animal protein thing, there is a fantastic new documentary out now called Forks Over Knives, which everyone should see! It’s based on T. Colin Campbell’s The China Study, one of my favorite books – full of jaw dropping research on the direct correlation between animal protein, to cancer, diabetes and heart disease. This book is a life changer, but its also a bit dense, so kudos to the guys who made it accessible to everyone in Fork Over Knives!
“Ode to Annapolis” Apple Pinot Blackberry Tart
 A few days ago my best childhood friend Beca and I went on an “Old Stepdads Tour” of Annapolis, the small town along the Northern California coast we grew up in. When we were kids, Annapolis was virtually unknown – one tiny post office which was only open until noon and maybe 350 people scattered around in the redwoods, making their living either growing pot, logging, or working the one little K-8 elementary school. (Very small – my 8th grade graduating class was 4 kids… including me). Our town was socially split into “rednecks” or “hippies”, with my family and Beca’s definitely landing in the hippy camp.
Beca and I grew up riding horses through the redwoods, picking huckleberries and blackberries in the summer, and trying to avoid getting shot in the hunting and pot harvest seasons. My mom and stepfather Doug were both vegetarians with a huge organic garden, which I have to admit I only appreciated for the trade in-value of our gorgeous homegrown strawberries that were swapped surreptitiously at school for white bread Fluffernutter sandwiches. I am also sorry to say that my mom’s truly gourmet whole wheat, cream cheese and artichoke-heart sandwiches ended up in the garbage can nearly every time. But growing up with hippy parents in Annapolis obviously set the stage for my (eventual) interest in organic, local, healthy gourmet vegetarian cooking, and probably gave me an early taste for marketing as well!
 Beca and I spent the first couple of hours with her stepfather Bob, whose property was literally dripping with ripe apple, plum and pear trees, and left with bags of intoxicatingly ripe apples as well as several jars of Fandango Spice Garden jam which is made by Bob and Cheryl and sold in local farmers markets. They do not have a website so if you ever see it in California make sure to snatch a bottle up – it’s fantastic, with flavors like Satsuma Plum and Raspberry Shiraz. I love a fruit and wine combination!
After an afternoon of reminiscing and driving up and around the dusty back roads of Annapolis, we ended up for dinner at Doug and his wife Jane’s place – a completely craftsman yet impressively high-tech, solar powered, totally off-the-grid hand-built house with decks and studios overlooking miles of redwood-topped mountains all the way to the Pacific. We had a delicious vegetarian meal, freshly picked from the garden, and watched news of Hurricane Irene rolling towards NYC on a TV monitor larger than most NY cinema screens. It was an amazing mix of country and technology.
From the decks you could also see some new vineyards cropping up on the ridges. Recently, as with Napa Valley and the rest of Sonoma, grapes have come to Annapolis and with them a lot of controversy over clearing mountains of redwood trees to make way for Pinot grapes. I don’t have anything against a few vineyards, but I have seen how this mono-crop has eaten up much of the gorgeous diversity of the rest of Sonoma County, and I can’t tell you how sad it would be to see more redwoods cut down and more damage done to the delicate local watershed. Trees and fish are not a fair trade for wine.
This tart, full of Annapolis apples, summer blackberries and a splash of Pinot just to rile things up, was made from an afternoon full of warm childhood memories. I hope you can taste them too.
Apple Pinot Blackberry Tart
- 1 1/2 recipe Perfect Butter Crust (see below)
- 1 1/2 pints fresh ripe blackberries
- 1/2 cup agave syrup
- 1/4 cup Pinot Noir
- 6 – 7 ripe summer apples
- 1/4 cup local honey
- 6 T small pearl tapioca
- 1 t vanilla
- 1/2 t cinnamon
- pinch of salt
Make a Perfect Butter Crust ( or use your own favorite double crust recipe) using 2 cups of flour and 2/3 plus 2 T butter, and increase water slightly. Split dough into two balls, one slightly larger than the other, flatten each gently and chill for 1 hour.
Roll larger crust out and line a large quiche or deep dish pie pan with dough, allowing the edges to overlap the pan slightly. Chill. Roll smaller ball out and cut into strips. Weave strips together into a lattice top and chill on wax or parchment paper for 20 minutes until firm enough to handle.
Preheat oven to 425° and prepare filling:
In a small pan, cook blackberries with Pinot and agave syrup on medium heat for 5 minutes. Allow to cool while you prepare apples. Peel and slice apples thinly, tossing in a large bowl with honey, tapioca, cinnamon and salt. Crush blackberries through a strainer, discarding seeds, and add to apple mixture. Allow to sit for 20 minutes and pour into chilled bottom tart shell, smoothing out any wayward bits of fruit on top.
Gently roll lattice top onto a rolling pin, transfer to top of fruit mixture and carefully unroll onto tart. Flute lattice and tart edges together and bake for 10 minutes in 425° oven. Turn oven down to 350° and continue baking for 1 hour until top is gently brown all over. Make sure there is a pan with foil at the bottom of the oven to catch the drips. Enjoy!


Creamy Blue-Green Pesto (Vegan, too)
Pesto, like chocolate, is one of those wonderfully strong-flavored things that you can slip all sorts of healthy stuff into without anyone guessing. My most favorite surreptitious ingredients in basil pesto are hemp seeds and blue green algae. Hemp seeds are full of complete and easily digestible protein, have the highest essential fatty acids of any plant food on the planet – a perfect 3:1 ratio of Omega-6 Linoleic Acid and Omega-3 Linolenic Acid, which is good for for your heart and immune system – and best of all, they taste a bit like pine nuts. (They can completely replace the nuts in your pesto recipe without anyone noticing, but I usually do a mix of hemp and raw cashews because I really like the sweet creaminess the cashews add.) The blue-green algae is full of chlorophyll and phytonutrients, plus adds some trace minerals and vitamins, and can also go undetected, even by the pickiest of (12 year old) eaters. My boyfriend’s son Kai generally does not eat “foods of color” but curiously loves pesto, which is what motivated me to try to slip as much other healthy green stuff in as I could. The last time I made it we did it together, but I slipped in the blue-green algae at the end when he wasn’t looking. Can’t reveal everything to everyone all the time…
 Creamy Blue-Green Pesto (Vegan)
- 1 bunch fresh basil, washed and picked (about 3 cups)
- 1 cup extra virgin olive oil
- 2 cloves garlic
- 1/2 cup raw cashews
- 1/2 cup hemp seeds
- 1/2 teaspoon sea or Himalayan salt
- 1/2 t umeboshi vineger (optional)
- 1/2 t fresh black pepper
- 4 capsules Crystal Manna Blue Green Algae
Save out a handful or basil leaves, and then blend all remaining ingredients well in blender or Vitamix until smooth and creamy. Taste and adjust for salt – this should be well salted and fairly intensely flavored, as a little goes a long way. Add remaining basil leaves and blend briefly, maintain a little texture. (You can add in a few more nuts here too, if you want a little crunch). Use at once or keep in glass jar with a puddle of olive oil on the top to keep it from going brown. Will keep 1 – 2 weeks in the fridge.
Play with your pesto!
Pesto can be made with really anything so please get creative with what is in the fridge.
- Add a little parsley to the blender to up the green intensity
- Add a bit of nutritional yeast to make it richer and slightly cheesy
- Use any other type of nut here, pine nuts are traditional, but I have had great pesto made with pistachios, walnuts and even sesame seeds. Or make it with all hemp.
Also, I just want to say that the amounts of everything are extremely flexible – I have make a 10 minute pasta with a “chunky pesto” sauce using about 10 basil leaves from a withering basil plant who’s day had come… in this case it went into a mortar and pestle with 1/2 clove of garlic and a few tablespoons of olive oil, salt and pepper and got chopped toasted pine nuts mixed in later. Just proving that 10 fresh leaves are infinitely superior to any pre-fab pesto sauce you could ever buy from anywhere!
Pesto is not just for pasta- its great on steamed potatoes and vegetables, and is fantastic mixed with quinoa. If, like me, you never thought “fantastic” and “quinoa” should appear in the same sentence, check out Pesto-Quinoa Stuffed Tomatoes with Roasted Portabellos
